|
These miniature wargame rules are designed to simulate
battalion and regimental level ground combat during World War One. Players
represent field commanders who must maneuver their various units against the
enemy in the face of many factors outside their control. Elements such as
artillery support, air power, defensive positions, and reinforcements are only
randomly available. The game's setup rules allow the possibility of both
tantalizing mismatches and dead-even slugouts, preventing players from
"calculating" too many of their options. After all, field commanders are rarely
able to work out evenly matched scenarios with their enemies, so be prepared...
you never know exactly what's coming next!
« 1.1 Bases & Markers
In
order to play 1916, all infantry, towed artillery and small vehicles such as
motorcycles need to be mounted on bases made of thin wood, metal or plastic.
Larger vehicles such as tanks and armored cars may not always need to be
mounted, although for game play purposes each vehicle is still referred to as
being on a base. Basic infantry combat is conducted with bases, not figures, so
players may use any scale of miniatures in whatever quantity they prefer. Below
is a chart showing some standard base sizes which were used to develop the
rules, along with recommended numbers of figures per base. Note that base sizes
used do not need to exactly match those shown below, and players should feel
free to use their own basing systems.
Scale - Each infantry base represents twenty men,
each cavalry base represents ten troopers and each weapon or vehicle base
represents two pieces of equipment, except for light machine gun bases, which
represent three weapons instead of two. The three different game scales which
are available; small, medium and large, allow all major figure scales to be
used for play. Due to the three different scales offered, all distances within
the rules text are referred to in yards. The combat chart for each scale refers
to all ranges in inches, corresponding to the scale distances needed to play in
that scale.
Base &
Range
Chart |
|
Large Scale
1" = 20 yards |
|
Medium Scale
1" = 30 yards |
|
Small Scale
1" = 40 yards |
|
|
Base
Size |
Figure Scale |
|
Base Size
¹ |
|
|
Base Size
|
Figure Scale |
| Troop Type |
|
(inches) |
20mm |
15mm |
|
(inches) |
15mm |
|
(inches) |
12mm |
1/300 |
| Infantry |
|
1½ x 1 |
2 |
3 or 4 |
|
1 x 1 |
3 |
|
¾ square |
2 or 3 |
5+ |
| Cavalry |
|
1 x 1½ |
1 |
2 or 3 |
|
1½ x 1 |
2 |
|
¾ square |
1 or 2 |
3+ |
| Mortar |
|
1½ x 1 |
1 |
1 |
|
1 x 1 |
2 |
|
¾ square |
1 |
2+ |
Anti-tank rifle,
machine
gun |
|
1 x 1½ |
1 |
1 or 2 |
|
1 x 1 |
2 |
|
¾ square |
1 |
2+ |
| Towed cannon |
|
1½ x 2½ |
1 |
1 |
|
1¼ x 2 |
1 |
|
1 x 1½ |
1 |
1 or 2 |
| Motorcycle/Bicycle |
|
1 x 1¼ |
1 |
1 |
|
1 x 1 |
1 |
|
¾ square |
2 |
2 |
Small to medium
tanks and vehicles |
|
none or
1½ x 2 |
1 |
1 |
|
none or
1½ x 2 |
1 |
|
none or
1¼ x 1¾ |
1 |
2 |
Medium to large
tanks and
vehicles |
|
none or
2 x
3 |
1 |
1 |
|
none or
1¾ x 2½ |
1 |
|
none or
1¼ x 2 |
1 |
2 |
| Aircraft |
|
3 x 3 |
1 |
1 |
|
2 x 2 |
1 |
|
1½ x 1½ |
1 |
1 or 2 |
Regimental
Command |
|
1½ dia.
minimum |
Any |
Any |
|
1¼
minimum |
Any |
|
1 dia.
minimum |
Any |
Any |
| |
|
|
|
|
|
|
|
|
|
|
|
| Weapon Ranges |
|
|
|
|
|
|
|
|
|
|
|
| Assault Weapons ² |
|
3" |
|
2" |
|
1½" |
| A.T. Rifle |
|
5" |
|
4" |
|
2½" |
| Small Arms |
|
30" |
|
22" |
|
15" |
| MG vs Personnel |
|
30" |
|
22" |
|
15" |
| MG vs Tank |
|
10" |
|
7" |
|
5" |
| Trench Mortar |
|
5" -
60" |
|
4" -
45" |
|
2½" - 30" |
| Lt. Artillery (1-5) ³ |
|
60" |
|
45" |
|
30" |
| Heavy Artillery (6+) ³ |
|
90" |
|
72" |
|
45" |
¹ — Players may want to use sizes other
than those shown. For example, 11/8" x ¾" for
infantry bases can easily be used with good effect.
² — Assault
weapons include flamethrowers and submachine guns.
³ — Direct fire
artillery only. Barrages have no range limit. |
Game Markers - Game markers are used to track the
status of combat units, and may consist of miniatures mounted on single bases,
colored death caps or colored board game chits. The following list illustrates
the most common markers needed for game play.
- Demoralized: Casualty figure, red death cap
or red chit.
- Prone: Prone figure or a green chit.
- Immobilized: Tank track segment or grey
chit.
- Damaged: Black death cap or black
chit.
- Pass fired: Firing figure or white
chit.
- Jammed: Yellow death cap or chit.
- On call Artillery: Any small, black, round
object. Black or red glass "stones" used for role playing are excellent.
« 1.2 Terrain
The most
common terrain systems used for miniature wargamimg employ flocked stryofoam
which is cut into shapes used to create realistic scale battlefields. The most
common system is called GeoHex, a series of modular terrain systems which are
pre-cut into plateau-shaped hill segments. For game play, each hill section is
considered to be one level high. Units within 40 yards of a hill's edge (the
meeting line between the slope and flat hill-top) may spot and be spotted by
those on lower levels, otherwise they are considered to be too far away from
the edge of the plateau to establish line of sight. Treating gaming hills as
the plateaus they resemble is usually the best way interpret these features.
This also creates dead ground along the bases of most hills, which is another
realistic effect.
To create roadways, players may either buy the GeoHex
road sets, or use varying widths of masking tape to show main and secondary
roads. Colored felt or cloth may be used to cover or outline the locations of
woods, towns and fields. Scale trees and buildings may then be placed on these
outlines. Lichen can be used to create hedges or areas of brush. Players may
want to modularize changeable terrain, using hexagonal terrain sections to
create the outlines of woods and square sections to create the outlines of
building zones. This allows the selective removal of portions of the terrain
due to fire effects and other actions. All terrain removal rules assume that
players are using modular terrain sections which are roughly 60 yards across.
Players not using modular terrain will want to estimate terrain removal based
on this value.
Each segment of game-board buildings actually represents
the outline of a block of buildings. Troops inside these areas are not actually
inside a single building, they are actually in a built up area which include
everything from fence-lines, plots of land and taverns to churches, cemeteries
and government buildings. Make sure to consult the Terrain Chart below for
general guidance on the game-specific characteristics of various terrain types.
Players are encouraged to use this as a basis for creating their own
interpretation of basic battlefield features.
| General Terrain
Effects |
| Terrain feature |
Recommended Material |
Movement |
Height |
Blocks LOS? |
Cover type |
| Rough? |
Assault through? |
Impassable to: |
Prone |
Stand |
Weight |
Open? |
| Wood buildings |
Light grey felt |
Yes |
Yes |
- |
½ level |
Yes |
Yes |
Soft |
No |
| Brick
buildings |
Medium grey felt |
Yes |
Yes |
- |
½ level |
Yes |
Yes |
Solid |
No |
| Concrete buildings |
Dark grey felt |
Yes |
Yes |
- |
½ level |
Yes |
Yes |
Hard |
No |
| Fire
Trench |
Black
felt
(wide, continuous) |
Yes |
No |
Tracked, Horse, Wheeled |
0 |
No¹ |
No |
Hard |
No |
| Slit Trench |
Black felt
(narrow, continuous) |
No |
Yes |
Wheeled |
0 |
No¹ |
No |
Solid |
No |
| Foxholes |
Black
felt
(wide, segments) |
No |
Yes |
- |
0 |
No¹ |
No |
Hard |
No |
| Hasty Dig-in |
Black felt
(narrow, segments) |
No |
Yes |
- |
0 |
No |
No |
Solid |
No |
| Light
Woods |
Light
Green felt |
Yes |
Yes |
Wheeled |
1
level |
Yes |
Yes |
Soft |
No |
| Heavy Woods |
Dark Green felt |
Yes |
No |
Wheeled, Tracked |
1 level |
Yes |
Yes |
Solid |
No |
| Brush
or Scrub |
Lichen |
Yes |
No |
Wheeled |
0 |
Yes |
No |
Soft/Solid² |
No |
| Berm or Seawall |
- |
No |
Yes |
Wheeled |
0 |
No |
No |
Hard |
Yes |
| Stone
wall |
- |
No |
Not
applicable |
Wheeled, Horse |
0 |
Yes |
No |
Solid |
Yes |
| Hedge |
Lichen |
Yes |
No |
Wheeled, Horse |
½ level |
Yes |
Yes |
Solid |
Yes |
| Stream banks |
|
Yes |
No |
Wheeled |
0 |
No |
No |
Hard |
Yes |
| Lake or River |
Blue felt |
n/a |
Not applicable |
All |
0 |
No |
No |
- |
- |
| Marsh
or Swamp |
Blue/brown felt |
Double |
No |
Wheeled |
0 |
No |
No |
- |
- |
| Mud |
|
Yes |
No |
Wheeled |
0 |
No |
No |
- |
- |
| Sand |
|
Yes |
Yes |
- |
0 |
No |
No |
- |
- |
| Cratered areas |
Brown felt |
Yes |
Yes |
Wheeled |
0 |
No |
No |
Solid/Hard³ |
No |
| Barbed wire |
|
Special |
Yes |
Wheeled, Horse |
0 |
No |
No |
- |
- |
Chart Notes:
¹ —
Bases which are prone within trenches or foxholes are invisible to other bases
and may not fire, nor be fired upon by direct fire weapons (they may still be
attacked by area weapons).
² — Bases which are prone anywhere
within a scrub/brush area may still fire and be fired upon, with both parties
suffering the appropriate terrain modifier for solid cover (-2) as well as all
other applicable modifiers. Bases which are standing within a brush/scrub area
are considered to be in soft cover.
³ — Cratered areas are a
hybrid cover class. They only offer cover to units which have gone prone while
within the cratered zone. Otherwise, these zones are considered to be open
terrain. Upon going prone in a cratered zone, the player controlling the unit
must declare whether it is "engaging" or "hiding." If engaging, the unit may
fire its weapons and receives a solid cover bonus. If hiding, the unit may not
fire weapons, but it receives a hard cover bonus. Units which have gone prone
in a cratered zone have the over the top modifier applied to their
command rolls.
Chart Key:
Terrain Feature = Gives name
of the terrain feature in question. Recommended Material =
Suggested materials which may be used to re-create that terrain type on a scale
gaming board. Movement : Rough? = Indicates whether that terrain
feature counts are rough terrain. Moving through rough terrain costs double
normal movement rate. Movement : Assault Through = Indicates
whether a unit may move through that terrain type using its bonus assault
movement. Movement : Impassable = States which troop types may
not pass through that terrain type. Height = Indicates which height
class the terrain feature fits into. Block LOS? : Prone = Indicates
whether that terrain type will block the line of sight of prone infantry.
Block LOS? : Stand = Indicates whether that terrain type will block the line of
sight of standing (upright) infantry. Cover Type : Weight = States the
nature of cover (Soft, Solid or Hard) offered by the terrain type. Cover
Type : Open? = States whether the terrain cover type is open. Open cover only
gives protection when it lies between a direct fire weapon and its target (IE -
the protected base still resides on a patch of open ground). Open cover never
protects against mortar fire, area weapons or air attacks. Unless stated as
open, a cover type is considerd to be full cover, which cover and surrounds a
base while giving protection and cover. |
Barbed Wire - Units attempting to pass through wire
entanglements must subtract the value of one die roll by 10 yards from their
movement, remaining immobile if necessary (1D6 x 10 = yards lost). The passage
of a tank base across a line of barbed wire will destroy one wire segment at
the point of passage (wire should be used in segments equal to an infantry
base's width). Each on-call barrage roll of a natural 6 will, in
addition to other damaged inflicted, destroy one segment of wire if any are
present within the barrage zone. Each pre-game barrage roll of a natural
6 will destroy the closest segment of wire, if any, within 100
yards of the unit being shelled. A 60 yard diameter cratered zone is created at
the point that each wire segment is lost due to barrage fire.
« 1.3 Unit Types
There are
three types of combat units available to the player; personnel, tank and
aircraft. The distinctions are important to game play and should be remembered.
Heavy artillery support is handled abstractly and does not require the building
of units.
- Personnel Units - These units are numerous but
fragile. They are most susceptible to small arms fire and high explosives
(Anti-personnel fire).
- Infantry - The bulk of any army is the
infantry. Rifle and grenade armed troops, sometimes directly supported by light
machine guns and light mortars.
- Heavy weapons - These extra fire-support
bases allow the flexible concentration of firepower. Heavy, medium and light
machine guns, light and medium trench mortars, field guns, anti-tank rifles and
flamethrowers are the most common types.
- Assault Weapons - These lethal, short-range
weapons are used in three different ways: 1) As dedicated infantry sub-units.
2) As attachments to sub-units. 3) As individual heavy weapon bases. In all
cases they have the special ability to fire on the move while participating in
an assault. Assault capable weapons are: Flamethrowers and (rarely) light
machine guns or submachine guns. Assault weapon range is 60 yards
- Cavalry - During the course of the war,
cavalry was mostly relegated to scouting use but nevertheless remained on the
field in a heavy support role. Even in 1918 senior officers kept whole
divisions of cavalry available for use in the always-hoped-for
breakthrough.
- Cars and Trucks - These new inventions
triggered a revolution in battlefield mobility. They were however, vulnerable
to nearly all weapon fire and were seldom exposed to immediate front line
service.
- Tank Units - Tanks and their relations are
heavyweight units which combine various levels of mobility, firepower and
protection. Their most common shared feature is armor or other protection which
shields against shrapnel, small arms fire, and other battlefield hazards. They
are most susceptible to direct artillery fire, and are least vulnerable to
small arms fire and indirect barrages.
- Tanks - These tracked vehicles usually had
their main weapons mounted inside of an armored hull. Their primary role was to
neutralize machine nests and otherwise clear "safe" routes through enemy held
areas.
- Self-propelled artillery - Primitive tank
chassis with a cannon mounted on top of the hull.
- Armored cars - Fast, lightly protected and
armed, these wheeled vehicles were used mostly for reconnaissance. They are
more vulnerable to direct fire than tanks.
- Emplacements - Pillboxes and bunkers were
heavy structures used to protect infantry and heavy weapons. They were usually
earth or concrete enclosures.
- Aircraft - Planes of this period were limited to
spotting, shooting down observation balloons, and attacking ground troops with
machine guns and bombs. Their main influence was in helping to maintain a
general interdiction of enemy troops by gaining local (or regional)
superiority.
«1.4 Game Units
and Formations
Bases and Units - The bottom two levels of
organization used for game play are bases and units (also called
subunits). Each base is composed of several figures and each unit is
composed of several bases. These two non-historical components, bases and
units, are used to create the historical formations used in the game.
Personnel subunits always number either one, three, six, nine or twelve bases
each. Each of these units may conduct one attack roll on the Small Arms Fire
Chart per turn. Hence, formations with their strength divided into smaller
subunits will have greater firepower, and formations composed of fewer, larger
units represent less effective firepower.
Like infantry formations,
all-vehicle formations are composed of subunits. Unlike infantry formations,
these vehicle units are always composed of three bases, each of which may move
and fire independently of each other. Vehicle subunits must follow the same
base interval, command and morale procedures as infantry units.
Formations - There are two types of formations used
for game play; combat formations and command formations. Combat
formations are composed of subunits, and command formations are composed of
groups of combat formations. The most common combat formation is the battalion,
which is usually composed of several subunits. The most common command
formation is the regiment, which is usually composed of several battalions.
Either formation type may also have additional support bases attached to them
(see below). The Troops Lists and Notes pages include sample selections
of various historical formations accompanied by the numbers and types of bases,
units, formations and support base types to be used for game play. Players are
encouraged to conduct their own research in order to create their own favorite
units along the lines of those shown.
Support Bases - Some units or formations may have
extra heavy weapon or transport bases available to them. Most common are heavy
weapon bases, which may each conduct one fire attack roll per turn (some
transport bases do not have weapons and therefore may not fire). Heavy weapon
bases may operate anywhere within their parent formation's deployment zone as
dedicated detached bases or, if they are machine guns, anti-tank rifles
or flamethrowers, they may be attached directly to any base within any
sub-unit belonging to the formation (label the bottom of host infantry bases to
track the presence of attached support bases). The advantage of detached
operation is the ability to initiate assaults, maneuver for flanking positions
and/or participate in fire-storm attacks (see optional rule #301). The advantage of attaching is the relative
cover offered by mingling with the infantry. Attached weapons may still fire
independently of the host infantry bases.
Transport bases must always
operate as dedicated (detached) bases and will rarely have any fire capability.
Transport bases are allowed to standby by seeking cover anywhere within
the combat zone, even if doing so exceeds the allowable base interval for that
unit or formation. Transports which assume a standby position are not
considered stranded, but before moving they must still roll successfully on the
command chart with the Withdrawn modifier and any other applicable
modifiers.
Command Bases - Every bottom level command formation
must begin the game with a command base which abstractly represents its command
infrastructure. A bottom level command formation is the first formation of any
chain-of-command which is composed of combat formations instead of subunits.
Command bases cannot be attacked by direct ground fire or assault and they may
not be used for friendly spotting or attack purposes. Command bases may be
attacked and damaged, but not destroyed, by enemy barrages and air attacks. The
attackers must score an unmodified D or K result on
the Area Weapons Chart in order to damage a command marker. Due to their
special nature, command bases do not benefit from being entrenched or otherwise
protected, although there is no limit to how many times they may be damaged.
Each damage point scored against a command base will lower the command die
rolls of all subordinate units by one point.
The most common bottom
level command formation is the regiment, usually composed of several battalions
accompanied by support bases. In some armies of this period however, notably
the British, the bottom level formation is the brigade, which is why the rules
do not simply refer to all bottom level command formations as regiments. Also,
there were many specialized assault formations which enjoyed unorthodox command
structures which were clearly separated from those formations around them. Only
bottom level command formations are required to have command bases. Formations
above this level are assumed to be large enough to maintain communications
within their fronts.
| Base Intervals |
Personnel
(according to
training) |
Vehicles
|
| Poor or worse |
Average |
Great or better |
| 40 yds |
60 yds |
120 yds |
Line of sight |
|
Early War Intervals
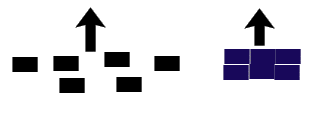
Above is shown the difference between
early war close order or "packed" subunits at right, and mid/late war open
order subunits at left. Open order units may disperse their bases up to the
limits allowed by the base interval rule. Only subunits for the early war
periods have limited intervals. |
Intervals and Deployment - All member bases of each
unit must remain within a certain range of each other during game play. This
range is known as the base interval. The maximum allowable base interval
is limited by the unit's training level as shown in the Base Intervals chart at
right. The entire area occupied by and immediately surrounding all of a
formation's component units is referred to as the deployment area. This
includes areas between bases as well as a border zone surrounding the formation
equivalent to the allowable base interval.
There is no minimum allowable
base interval. Component bases of a unit may operate as close or "packed"
together as the controlling player wishes, although the player must visually
estimate any minimum distance condition. No measurement of minimum base
interval is allowed outside of the fire phases except when required by
passing fire attacks. This restriction on pre-measurement does not apply
to maximum interval conditions, which may be confirmed by direct measurement at
any point during the movement phase.
Support bases may not be used to
"bridge" or otherwise lengthen the intervals between unit bases. Individual
bases which find themselves separated from the rest of their parent
unit/formation (usually due to casualties) are considered stranded. Stranded
bases remain stationary until bases from their unit or formation re-establish
contact by moving within the proper base interval. If a large unit is split in
half in this manner, the larger half will become "in command" and the smaller
half is considered stranded.
Example: An average trained unit may separate its
individual bases by as much as sixty-yards from base edge to base edge. A
machine gun attached at regimental level may move anywhere within this area,
but it must remain within three inches of at least one supported base belonging
to a unit from the same regiment.
Early War Intervals - Early war infantry &
cavalry subunits must keep all of their component bases in contact with each
other (known as close order). See the individual national troop lists
for exceptions and respective dates of transition from close order
formations.
Support Range - All friendly units offer a general
support to each other by their mere proximity. This is referred to as
support range, which becomes an issue at several different points in the
game, especially regarding setup and morale. Support range for all units is 240
yards.
« 1.5 Troop Quality
Every unit in game play is assigned a morale level and a training level. These
levels affect virtually every aspect of unit performance, and have a profound
effect on the outcome of a battle. Below is an outline of these troop grades,
and a short description of the conditions for each.
Morale Grades
- Reckless: Usually highly trained
specialists who are supremely confident in their abilities, these men are truly
dangerous and they know it. They will take apparently suicidal risks in the
daily pursuit of their job and come back ready for more the next day. Some
reckless troops lack professional training, and draw on religious or ethnic
grievances to fuel their actions. The later type tend to have extremely low
training levels.
- Brave: Good, old-fashioned crack troops,
firmly indoctrinated in the traditions of their particular service. Brave
troops are more numerous than reckless troops, and do not have the same
disregard for personal safety. But you had better pay them the respect they
deserve, otherwise they will be eating dinner in your dugout tomorrow
evening.
- Steady: The result of most armies of the
world, average, steady troopers are capable of dishing out plenty of punishment
and absorbing a lot in return. They will however, eventually give way if put in
too difficult of a situation.
- Unsteady: The weakness of their officers
makes these men nervous, because they aren't sure what's going to happen. They
may be fighting an enemy they would rather not fight. They also may be new,
poorly trained troops who know their immediate higher-ups are just as green and
vulnerable as they are, compounding an already nervous and panicky
situation.
- Mutinous: A complete breakdown in
confidence has occurred between commanders and their men. The men believe that
their lives will be (and probably have been) completely wasted in futile
engagements. A famous real-life example would be a few French units of 1917,
who upon passing of an officer's command car would bleat like sheep to
demonstrate their resentment of being led to slaughter.
Training Grades
- Outstanding: Mere extensive drill and
practice is not enough for these guys. They are usually practitioners of the
latest tactical theories, and have an intricate familiarity with any and all
weapons needed for the tasks at hand. Aggressive, strong and smart, their
actions are almost always well coordinated with those of other supporting
units, including artillery and other nearby specialists.
- Great: The best training available for
large formations. Great training comes with time and a generous commitment of
equipment and resources for the task. Formations with great training have a
much better chance of springing back from adversity than other less fortunate
units.
- Average: Again, the world norm for drill
and equipment usage. Average troops will usually have a good idea what to do
next, and they will always have the basic tools to do the job, coupled with the
knowledge needed to use those tools.
- Poor: These guys are trying to do the right
thing, but their own government is conspiring to prevent them from doing it.
They probably do not have enough equipment to train with, and maybe even not
enough to fully outfit their units. There also may be other factors, such as a
multi-national force which suffers from major language or class barriers and
which constantly interferes despite the best marginal efforts of everybody
involved.
- Abysmal: A truly unfortunately situation.
Abysmally trained troops have been thrown into a situation about which they
probably know absolutely nothing. They are usually illiterate, under-equipped
and/or poorly supplied. Their own government barely manages to arrange for them
to be fed and clothed, and their officers are too few and too unprepared to
cover the tasks at hand. In fact, the poor training of their officers may even
be the main reason entire units are sunk to such a low level of
efficiency.
| Turn Sequence |
- 1) Attacker movement
- - Roll for lull if required by set
up (remainder of turn is cancelled if lull occurs).
- - Units must pass command roll
before Maneuvering or Assaulting .
- 2) Defender fire
- b) Direct ground fire
- d) Air strikes
- 3) Defender
movement
- Units must pass command roll before
Maneuvering or Assaulting .
- 4) Attacker fire
- b) Direct ground fire
- d) Air strikes
- 5) Casualty morale
test
- 6) Assaults
- a) assault resolution
- b) rout morale test
- 7) Barrage
- a) Calculate casualties
- b) Remove previous
markers
- d) Place new markers
|
« 1.6 Turn Sequence
To
begin a game, use the Setup Sheet in order to establish attacker/defender,
availability of barrages, on-call artillery, gas, defenses and other optional
setup features. Setting up the game like this is recommended because it uses a
varied system for establishing use of heavy support. Experienced players may
want to use the Advanced Setup Sheet, or they may want to create and use their
own set up system. All personnel class units may begin a game in a hasty dig-in
position and/or prone. Keep in mind that prone units must pass a command roll
in order to stand, possible causing a delay in their post barrage deployment
(getting the men to stand up in their trenches). Vehicle units may start the
game as moving. Once the game begins, the sequence of play is followed until a
Lull occurs. See the Setup chart for complete definitions of combat
lulls.
|
