«
Republic 1.0
Updated January 25, 2025.
Beta Test Edition.
«
1 INTRODUCTION
Republic was
designed to recreate battles of the American Civil War with the best
combination of play time and convincing results. In order to achieve this we have streamlined the warfighting perspective to that of a
corps or army commander. There are no volley fire calculations; all brigade
level combat is covered in general assault rounds which are driven to full
resolution each turn. Skirmish fire has been abstracted to reflect its effects,
while still being depicted on the board as status markers which look like
skirmishers. Artillery fire has been calibrated to give the most accurate
possible final battle results, while not taking too much game time for
resolution. Ultimately, the goal is completion of a large Civil War battle by a
medium size gaming club in a full day of game play. For convention play and
other places with space, player or time limits, more modest sized battles of
the period would probably be a good fit. For those who crave even greater
historical detail, numerous advanced rules are also available.
«
1.1 Scale
Infantry bases represent
275 men each, cavalry bases represent 150 men each, artillery bases represent
10 guns each. For game play, Republic artillery bases are still referred to as
batteries even though tactical-level artillery batteries of this period
employed fewer guns. Each full turn represents approximately 40 minutes of
battle time. The game can be played with any size of miniatures at four
different ground scale ranges.
«
1.2 Equipment
All game play is
conducted using ten-sided dice with the number range on the dice representing
the numbers one through ten (1 - 10). The abbreviation for a ten-sided die is
1D10. A standard (imperial) tape measure and
firing arc are also needed for
measuring and targeting. The most important equipment are the many miniatures
and markers you will want to fight battles:
Morale Markers - A common feature of many wargames
are death caps, which are used by some rules to indicate losses on
multi-figure bases. In Republic, these same caps can be used to indicate morale
hits suffered by a formation. The caps should be colored yellow, red and black
in order to indicate rattled, shaken and demoralized morale
conditions respectively. Better markers for the battlefield are
small 3/8" wooden cubes sold at
hobby stores. They are easily painted and have a clean look for placement next
to units.
Marker Bases - In order to show leaders, special
actions or formations, use marker bases. The marker types most needed for game
play are leader and skirmish markers (see below). Listed below is an outline of
useful markers for game play:
Leader Marker - Every divisional,
corps and army level officer (leader) in the game's order-of-battle should be
represented on the battlefield. This is typically done using the mounted
general figures that are part of every line of wargaming figures. The officers
should be mounted on single-horse
bases in order to allow them to fit in amongst the various bases in their
command. These bases are interchangeably referred to as leaders, officers,
commander or generals.
Skirmish Marker -
Skirmish markers are
used to depict skirmishers who have deployed out of their parent unit. Unlike
the other markers noted below, skirmish markers represent an extension of their
parent unit's combat capacity, and the skirmish markers themselves may conduct
attacks that affect the morale of enemy units. The best way to create a
skirmish base is by mounting a single light infantry figure on a small, square
base (see base sizes below).
Limber Marker -
Limber markers are used to
depict horse teams used for pulling (towing) artillery
batteries. These relatively small, square bases do not need to represent full
multiple-horse and wooden limber teams of real-life, because such a
representation would consume far too much playing area. Instead, a single pair
of draft horses suffices to show the location and status of the horse teams
that will be used to move the guns around the battlefield as needed. Players
can leave the markers off the field when not in use (e.g., when the guns are
unlimbered) and place them only when the guns need to "limber-up and move." Or,
players can leave the limber markers to the rear of
deployed (unlimbered) batteries
in a way that makes it obvious that the guns are not limbered (facing guns,
sideways to guns, etc.).
Saved Fire Marker - A
saved artillery fire
marker can easily be made by gluing together a small stack of four BBs (small
metal balls) on a small, round base and then painting them black.
Panic 4 Marker - Once any unit in a
division has suffered a level four panic event, place a P4 marker next
to the division commander's base to show that a divisional panic die roll must
be done at the end of the turn. The best way to create a P4 marker is to
draw a "P4" on a 3/8" natural wood
block (same size as the morale marker blocks).
Combat Bases - Combat bases make up the units used
for game play, including infantry, cavalry and artillery formations. Most
wargame figures will be glued directly to the bases, which should be cut from
thin sheets of wood or metal. The figure scales most commonly used for Civil
War wargaming are 6mm, 10mm, 15mm, 18mm and 28mm, although other scales such as
3mm, 20mm, 25mm and larger are also widely used.
For game play purposes, unit composition is controlled by
the number of combat bases, not the number of figures. This allows players to
mount any number of miniatures they wish on their combat bases. Each base
should also be marked on the upper rear or bottom with the name or number of
the unit they represent. Brigades will commonly be named after the brigade
commander, which can be abbreviated if the base top has limited space (Example:
"Walker" could be shortened to "Wa"). Cavalry brigades may also use the name of
the brigade commander or senior regiment in the brigade. Artillery batteries
can be marked with their size and type (See 1.3 Units below for more details).
Each infantry or cavalry combat base is removed from play
after one base hit (B). An artillery base (battery) may sustain multiple base
hits, with each hit negatively affecting the battery's ability to move, rally
and inflict damage.
Artillery Bases - The base
frontage for artillery batteries in Republic represents a fairly packed gun
deployment. Such packed deployments could occur from time to time; when guns
were placed behind earthworks, in towns or in tight terrain. Or, just when a
commander needed lots of artillery fire put onto a narrow target. It is
something you will want the option of doing, but, such packed frontages were a
risk. The recommended spacing between guns was double that indicated by the
bases. So for game play, only artillery bases placed at double frontages
(positioned with open gaps to either side) are considered normal targets. If
positioned closer than that to adjoining batteries or combat bases, the
batteries in question are considered packed batteries and suffer
double any effects of enemy fire.
Below is a list of possible base sizes for each of the
common scales, however most any standard rectangular bases will work. Republic
uses the Fire & Fury basing standard, so any players using that system will
find translation over to this system fairly easy, although they will have some
leftover bases due to Republic's slightly more grand-tactical format.
| Gaming Scales » |
Small, 3mm-6mm
(1" = 109 yards) |
Medium, 12-18mm
(1" = 82 yards) |
Large, 28mm
(1" = 55yards) |
| Scale Ratios » |
0.75 |
1.00 |
1.50 |
| Measuring Systems » |
Metric (mm) |
Imperial
(inches) |
Metric (mm) |
Imperial
(inches) |
Metric (mm) |
Imperial
(inches) |
| Infantry bases: |
20 x 13 |
0.750 x 0.500 |
25 x 22 |
1.000 x 0.875 |
40 x 30 |
1.500 x 1.250 |
| Cavalry bases,
mounted: |
20 x 20 |
0.750 x 0.750 |
25 x 30 |
1.000 x 1.125 |
40 x 50 |
1.500 x 2.000 |
| Cavalry bases, dismounted: |
20 x 13 |
0.750 x 0.500 |
25 x 22 |
1.000 x 0.875 |
40 x 30 |
1.500 x 1.250 |
| Artillery bases: |
20 x 25 |
0.750 x 1.000 |
25 x 40 |
1.000 x 1.500 |
40 x 75 |
1.500 x 3.000 |
| Artillery Limber markers: |
20 x 20 |
0.750 x 0.750 |
25 x 25 |
1.000 x 1.000 |
40 x 40 |
1.500 x 1.500 |
| Leaders: |
13 x 20 |
0.500 x 0.750 |
25 x 30 |
1.000 x 1.500 |
30 x 50 |
1.250 x 2.000 |
| Skirmisher markers: |
13 x 13 |
0.500 x 0.500 |
16 x 16 |
0.625 x 0.625 |
25 x 25 |
1.000 x 1.000 |
| |
|
|
|
|
|
|
| Gaming
Scales refers to the name and associated ground scale for each scale
category. Scale Ratios are multipliers that players may refer to for
conversions. These ratios are necessary because the main rules text is written
for the 15mm scale. Players wishing to interpret distance-related rulings for
the other scales will need to multiply the distances quoted in the rules by the
scale ratios shown above. The base sizes associated with each scale group are
not absolute, and players may combine scales and bases for varying effects. An
extreme example would be the use of numerous 6mm figures on the base
family listed in the 28mm column, which would give a "big view" battle
perspective. |
«
1.3 Units
Each unit in Republic is
made up of combat bases which make up its total strength and depict that
formation's deployment area. The different branches of service have
varying methods of deployment as explained below:
Infantry - The standard infantry formation is the
brigade. Most infantry brigades may deploy their own screens
of light infantry using skirmish markers. For additional information see the movement
section, troop lists and advanced
rules.
Cavalry - The standard cavalry formation is the
brigade. Cavalry brigades may fight mounted, or they may wholly or partially
dismount and fight on foot like infantry. All effects of being mounted or
dismounted are factored into the rules, there is no need to show horse holders
or other supporting elements. Dismounted cavalry troops represent roughly half
of the number of troops present in a regular infantry base, so cavalry bases
should have comparatively fewer figures on them. For cavalry units/bases that
are dismounting, simply replace the mounted cavalry base with the corresponding
dismounted base aligned on the same front. See the movement section's special
cavalry rules for guidance on mounting and dismounting.
Artillery - Heavy rifle (HR) artillery batteries
represent cannon like 20-pound parrotts or 4.5" siege rifles. Medium rifle (MR)
artillery batteries represent cannon like 10-pound parrotts or 3" Ordnance
Rifles and their supporting howitzers (if any). Medium smoothbore (M Sb) artillery
batteries represent 12-pound Napoleon cannons and their supporting howitzers
(if any). Light smoothbore (L Sb) batteries represent 6-pound smoothbore cannons and
their supporting howitzers. Artillery bases in Republic represent fairly packed
batteries (minimum space between cannon), which is why there are no fire
modifiers downgrading counter-battery effects. See the Formations section below
for more information about artillery spacing and deployment. A base hit against
an artillery base causes the battery to be marked as damaged. Batteries can
sustain multiple base hits, although after several such hits they become
functionally useless for combat.
 |
|
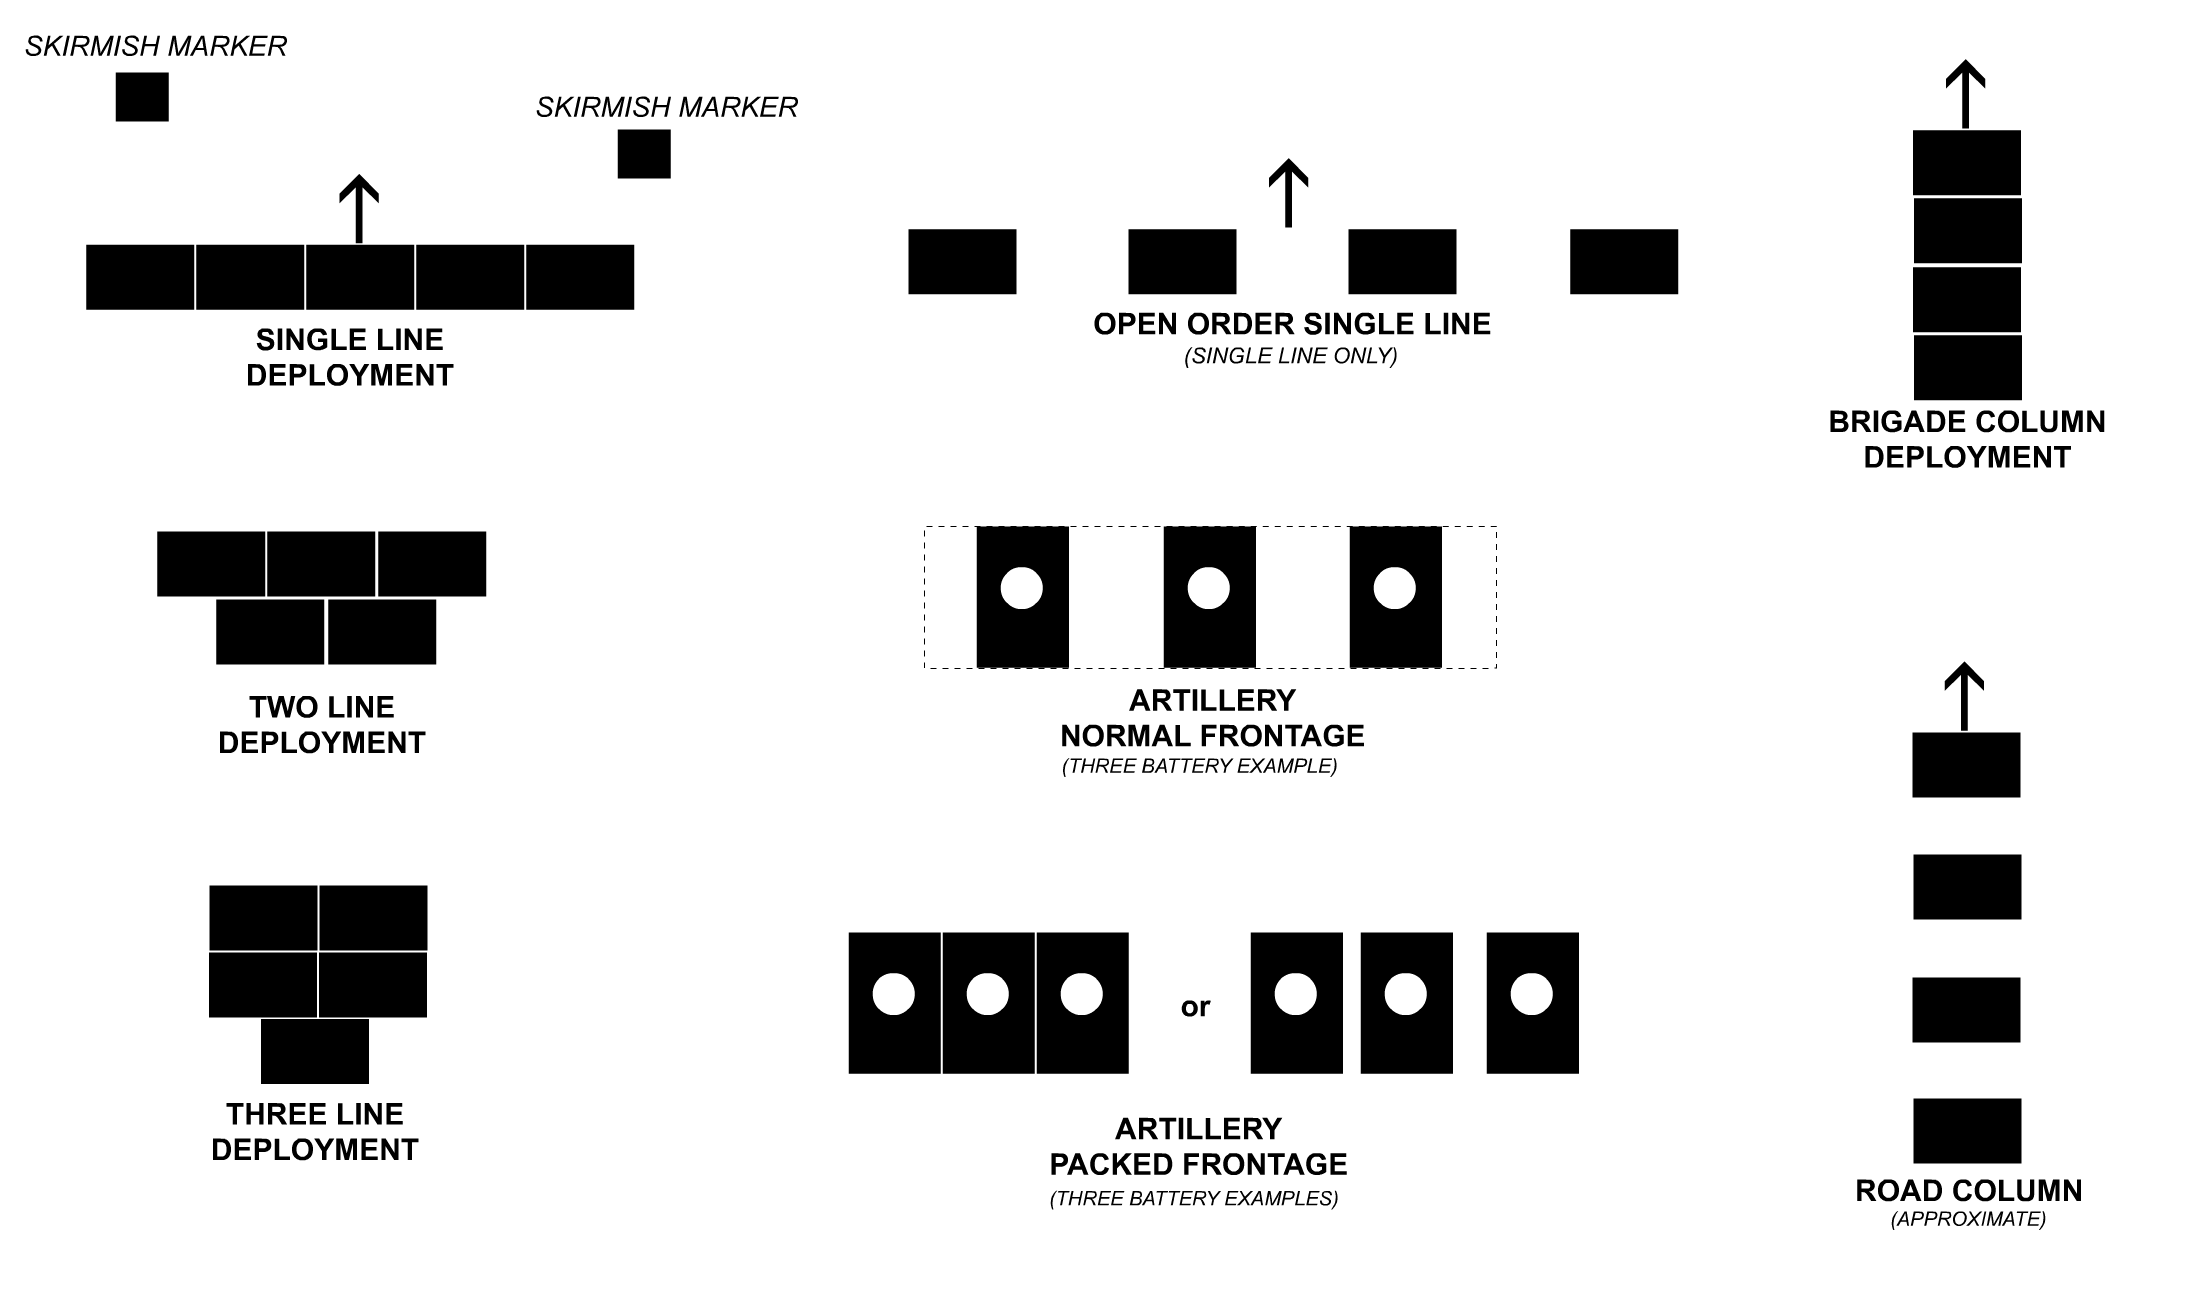
Figure 1.
Major
brigade and battery level deployments. Note that the lines and columns
typically thought of as the norm for battalions and regiments are not used
here. They exist within the brigade deployment zones and take place below the
command levels covered in Republic.
Click on the image for a full size
view. |
|
«
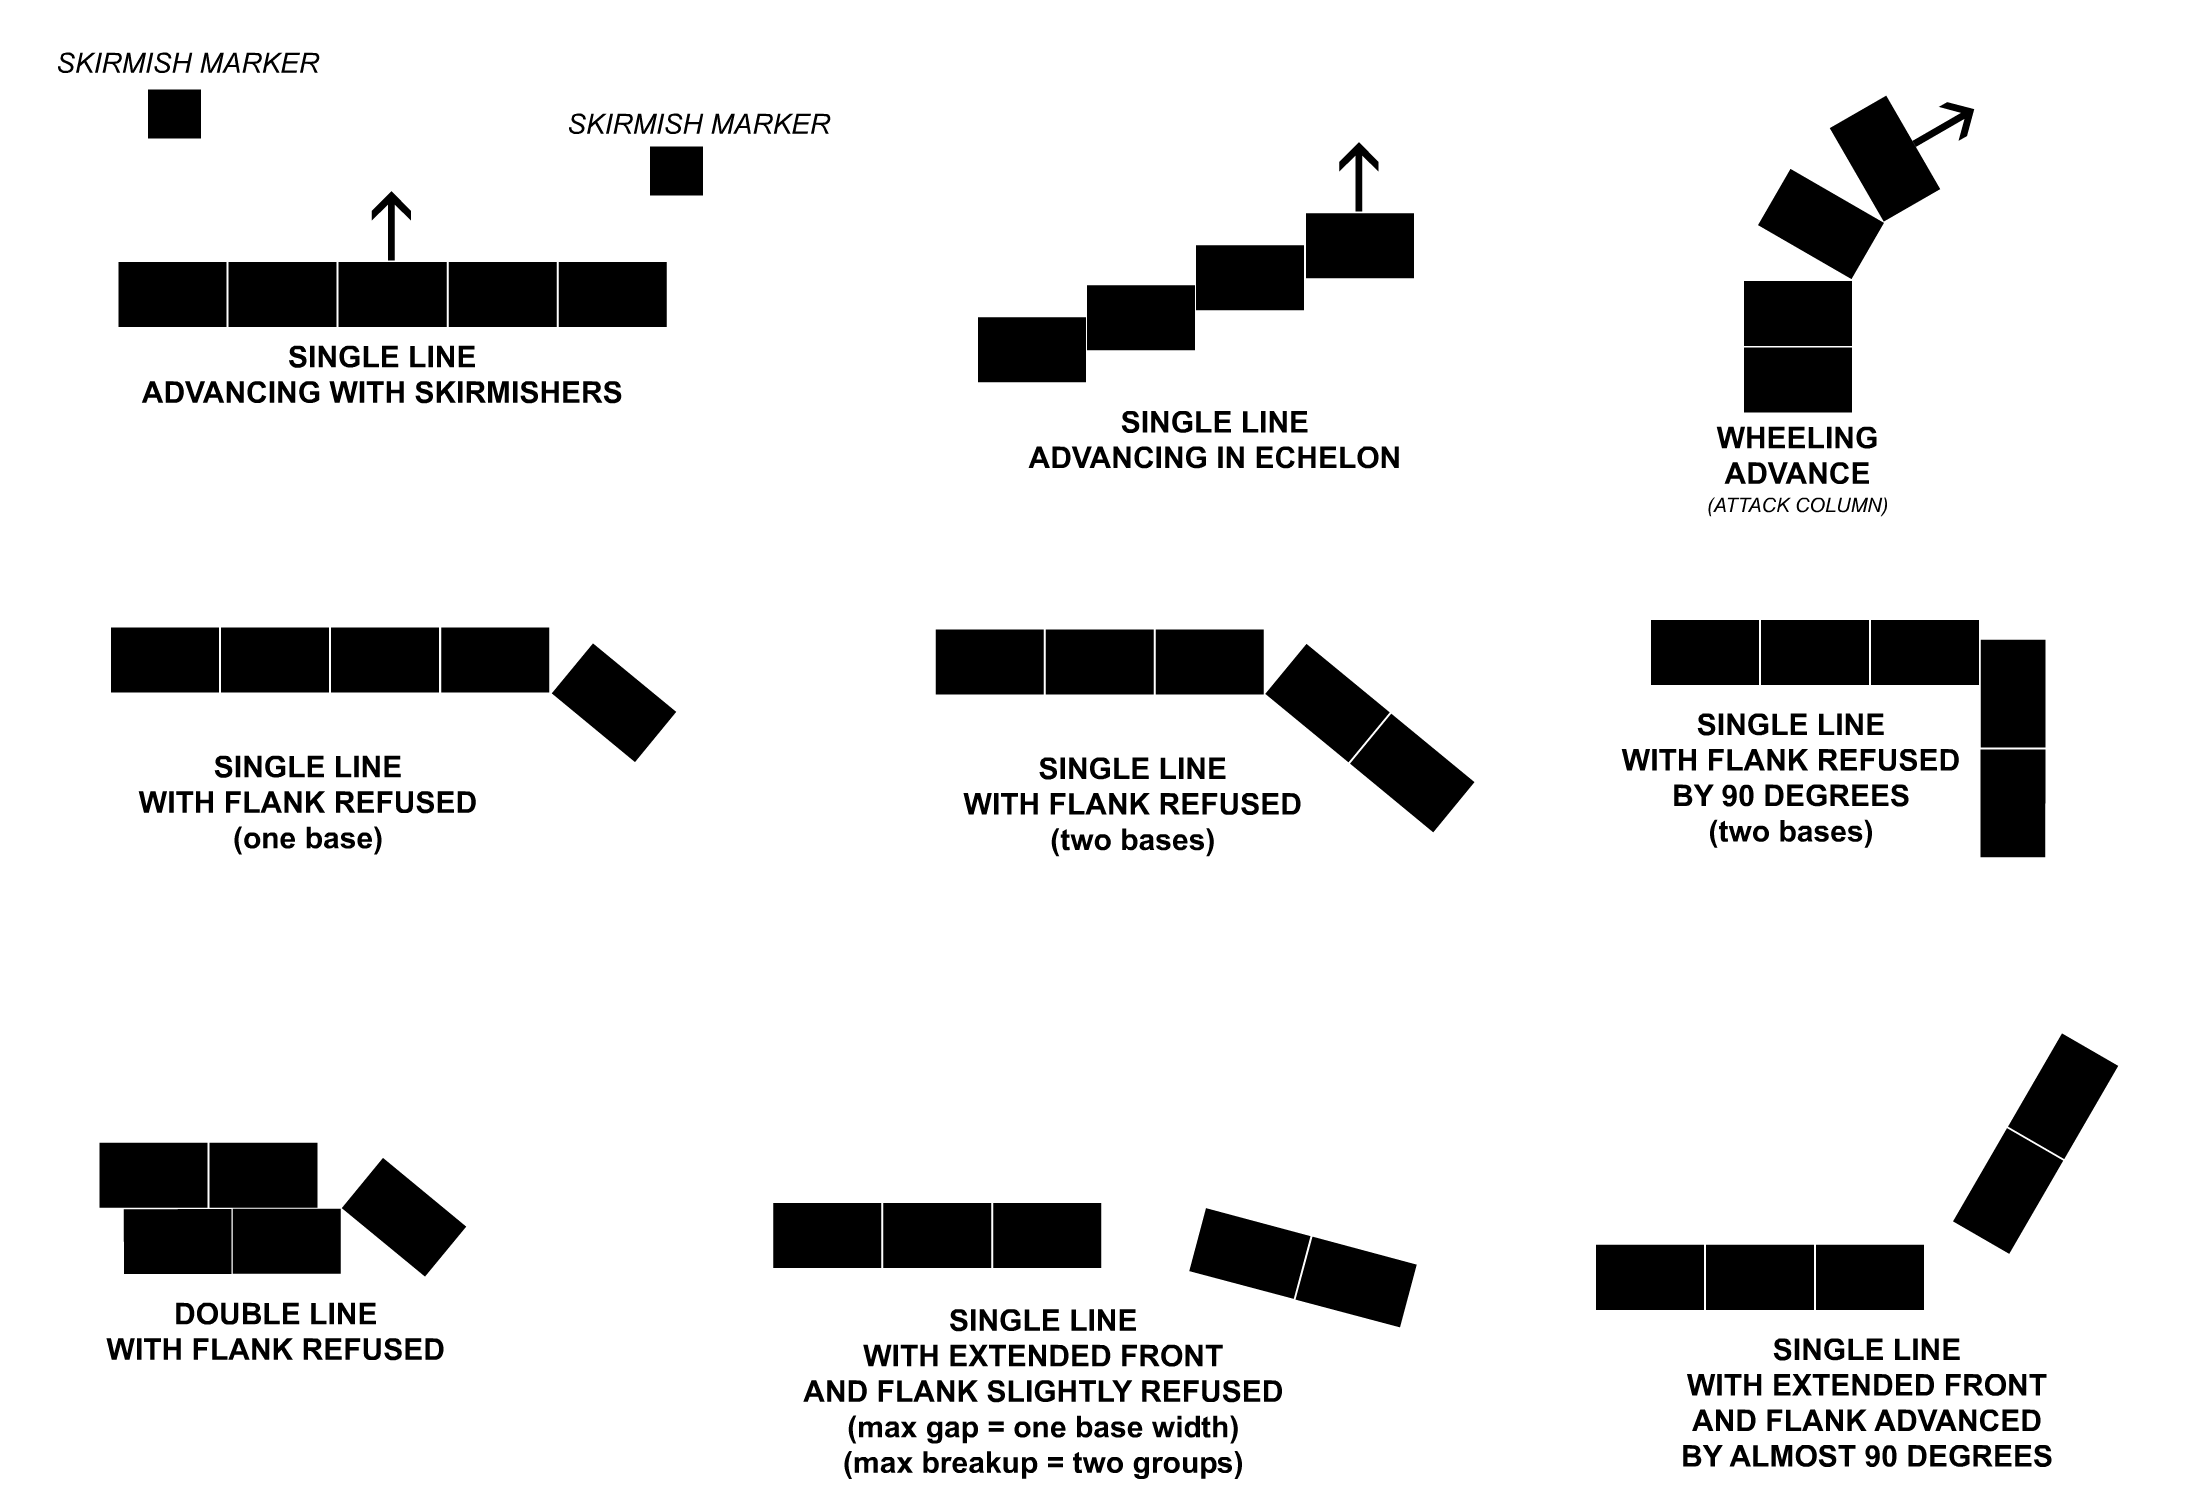
1.4 Formations
Each group of bases
representing a brigade's deployment area are placed into specific
Formations. The words "line" and "column" are only used to distinguish
between shallow and deep unit dispositions, not to infer the formations of
individual battalions or squadrons making up the brigades. Regardless of the
brigade formation, the sub-units that make them up are assumed to be in
formations controlled and ordered by local commanders.
Formation Types - Clicking on the thumbnail at left
will show the main types of grand-tactical formations available for game play
and how they relate to the direction of movement (note movement arrows for
reference). The essential brigade level formations are Single Line, Two Line
and Three Line deployments, referring to how many bases deep each one is. There
is also a Brigade Column deployment, with the combat bases in single file
facing the same direction. All of these formations are considered to be
close order and have the combat bases touching (base-to-base contact). A
brigade may also deploy into a Road Column, which operates as a very deep
brigade column with one-base spacing between the bases. Even though the a road
column's bases are spaced apart, the formation is still considered to be in
close order for purposes of artillery targeting, etc..
In the center of
the figure are the two main ways to deploy artillery batteries: normal and
packed. Normal deployment has each artillery base occupy double its
frontage, Packed deployment happens when the bases are closer together
than double frontage (any closer together than double frontage counts as
packed). Note that at normal frontage, a battery maintains an open space to
both sides.
Open Order - Also shown in Figure 1 is open
order, which spreads the troops over a wider area. A brigade using open order
must be trained (Green grade or better) and must space its combat bases at
one-base intervals (e.g. - double normal frontage). While in open order, a
brigade may deploy one skirmish marker per combat base. If involved in an
assault against enemy infantry or cavalry which is in close order (all bases
touching), the open order unit automatically counts as disadvantaged, see the
assault section special rules for more information.
Skirmish Markers - In the formation diagram is an
example of two skirmish markers deployed to the front of the single line. These
markers are used to indicate skirmish troops which have been thrown forward by
their parent units. See the Maneuver section for more about allowed distance
between skirmish markers and their parent formations. Not all units are able to
deploy skirmishers, and players should consult the troop lists for more
information on each nation's particular skirmishing abilities or lack
thereof.
Changing Formation - Units may change
between brigade formation types. For example, a brigade formed as a single line
may change to a double line, or a unit in road column may change to a
three-line deployment. If a unit changes formations twice in one movement
phase, each change counts as separate and reduces available movement
accordingly (i.e. - two movement penalties instead of one). The deployment or
recall of skirmish markers is not considered a formation change. Skirmish
markers can also be referred to as skirmishers. See the Maneuver
Systems and Movement Modifiers sections below for more information about the
limits and movement costs of formation changing.
Example Battalion
Deployments
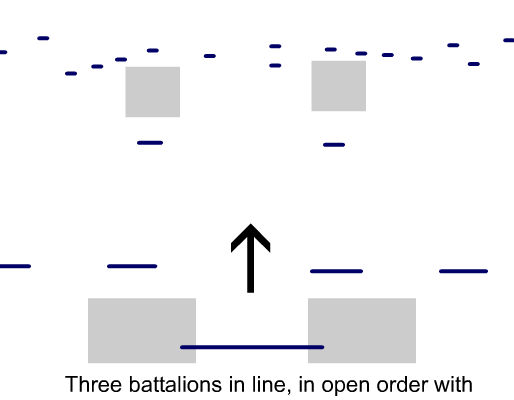
These example
deployments show the many different ways that infantry battalions might be
formed within the deployment zones covered by a brigade's combat bases. The
grey rectangles in the figure are the footprints of hypothetical combat bases,
the blue lines are example battalions. This is for demonstration only, players
have no control over the battalions inside of a brigade, which are considered
under local command. |
Higher Formations - The brigades discussed so far
will usually be grouped into divisions for game play. These divisions will in
turn be grouped into larger corps and armies or simply overseen by an overall
commander. For a continuation of these next levels of battlefield organization
see the Command section of the rules and the various troops lists posted on the
main Republique page.
«
1.5 The Battlefield
For game play,
the rules consider a few basic types of terrain including normal (open ground),
woods, towns, streams or rivers, roads and marshland, some of which may or may
not affect movement and combat. There are many different ways to show
battlefield terrain including plateau-shaped hill segments, scale trees and
buildings. We do recommend laying out footprints made from gaming mat
material or other gaming terrain to outline the extent of built-up and wooded
areas to make game play clearer. Republic is grand-tactical, so a building
actually represents a town block. Troops inside these areas are not in a single
building, but actually in a general built-up area which may include anything
from fence-lines, plots of land and taverns to churches, cemeteries and
government buildings. Consult the Terrain Table below for the game-specific
characteristics of various terrain types, which includes most common features
that are not obviously impassable like lakes or the ocean. Section 3.4 Movement
Modifiers describes the specific game board effects that terrain has on
movement. The Artillery Fire and Assault sections include descriptions of terrain
effects on combat.
«
1.6 Starting a Game
Set-up
Guide - See the separate Set-up Guide for extra details that help with
setting up and arranging the scale battlefield and general gaming area. The
guide also gives optional steps that add historical variety to a battle.
Otherwise, the main rules presume that players know how to setup a miniature
wargaming battlefield for game play.
Place troops - Players may simultaneously place their
troops on the board, or they may draw a map and record starting positions
before placing troops accordingly. The second method provides for more
surprises and a hint of fog-of-war, especially in cases where opposing units
start the game in close proximity. Another option is to take an overhead
iPad/tablet photo and then use the Photo Edit function's pen markers to draw
formation locations directly on the photo (or other tablet).
Turn Sequence - Each game turn sequence is
split into two player turns during which each side alternately acts as
the attacker. In order to establish the initial player turn cycle, each side
rolls one die (unless one side is the obvious attacker, as agreed upon
unanimously by both sides). The high roller may decide which player becomes the
first attacker, and the game begins with the first player turn. Players then
alternate turns as attackers throughout the rest of the game, with each pair of
player turns representing one game turn. Each game turn sequence
represents approximately 40 minutes of combat time.
«
1.7 Turn Sequence
Command Phase
- At the start of every player turn each defending player may
immediately send one written or text message to each friendly player. Next, the
attacking side will attempt to rally all units under their respective commands
which have morale hits. The attacking players may move leaders up to 3" during
the rally step in order to place them near units under their command in need of
rally support. The last step in the Command phase is to replace lost (hors de
combat) leaders with a new leader figure per section 2.5.
ONE PLAYER TURN:
- Command
- Defenders exchange messages
- Attacker attempts to rally units (Leaders
may move 2")
- Attacker replaces hors de combat
leaders
- Attacker Maneuver (attacker function
only)
- Attacker moves units
- Artillery & Skirmish Fire
- Both sides conduct simultaneous skirmish
function (block & attack)
- Both sides conduct simultaneous artillery
fire
- Both sides check for leader casualties
(hors de combat)
- Demoralized panic test (if any demoralized
units suffered P4 hits)
- Assault
- Resolve all assaults
- Both sides check for leader casualties
(hors de combat)
- Attacker applies charge disorder
- Panic
- Conduct divisional panic tests (internal
panic).
- Conduct inter-divisional panic tests
(adjoining panic).
|
|
Maneuver Phase - Attacking units may move according
to their respective movement limits.
Artillery/Skirmish Fire Phase
- Both sides start by conducting simultaneous skirmish actions per section 4.1.
After all skirmish fire is conducted, resolve all artillery fire and assign
resulting hits as required. All skirmish fire and artillery fire is considered
simultaneous. Finish the phase by checking for leader casualties (hors de
combat) and panic tests per section 4.7, as needed.
Assault Phase -
Resolve all assaults per section 5.0 until all formations are beyond all-out
assault contact range to the front of the attacking units. Check for leader
hors de combat and apply charge disorder if necessary.
Panic Phase -
Check first for division panic per section 6, then check for interdivisional
panic. Conduct all involuntary moves before ending the player turn. Proceed to
next player turn.
«
2 COMMAND
« 2.1 Chain of
Command
Republic uses a very simple corps/divisional command
system. Every infantry or cavalry brigade and associated artillery batteries
must have a divisional leader in charge of it, and every divisional leader is
controlled by someone who issues his orders (usually a human player acting as
the corps commander). Even in the rare case of units without any official
divisional commander, a leader who fulfills the role of a divisional leader and
who is considered such for game play purposes should be assigned (or the unit
re-assigned to a division).
In Republic, human player corps commanders move all of the
units in the divisions under their control and may reassign corps assets as
they see fit. Independent army level divisions are controlled by army
commanders in the same manner that divisions of a corps are controlled by a
corps commanders.
How this all plays out using human players is up to the
participating gamers. The most common scheme is to have one human player in
charge of each corps, and the various human corps commanders communicate with
each other using written messages (or talk in person if their board-level
leader figures are in base-to-base contact). Players may, or may not agree that
one person on their side is the commander-in-chief who issues written or verbal
orders to his fellow players. In some cases, a single human player may be
controlling several corps and independent divisions. In those cases, he will be
moving all of the divisions in his chain-of-command and he simply has to make
sure that the associated corps and army level leader figures are correctly
positioned on the battlefield for best maneuver, assault and rally results.
Human Players and Written
Messages
Corps or army level players (and for small battles, maybe
even divisional level players) whose on-the-board command figures are not in
base-to-base contact with each other are not allowed to discuss the battle or
exchange verbal orders/messages with each other during the game. This includes
not using obvious body language such as pointing at units they want the other
person to move, etc.. Instead, each player may send without delay, one
hand-written or texted message to each other player on their side, once per
game turn at the start of the opposing player's player turn. If a
single player is in charge of several corps, he is not required to send
messages to himself, the written message system is meant purely as a control
over verbal contact between several players on the same side.
«
2.2 Leaders
Leader figures can
benefit units under their command by using a numbered rating to boost
unit assault performance and by helping with rallying. Each leader also falls
in to one of three classes that affect how quickly they might react on
the battlefield. Each leader's resulting value will be an alpha-numeric with
the class first and the rating second. For example, Robert E. Lee would be an
E4 (Energetic-Four) whereas General Banks would be a C0 (Cautious-Zero).
Leader ratings - Ratings are numbered from
a minimum of minus one (-1) to a maximum of four (4). For use in rallying, the
ratings become steadily less effective at longer distances, as measured in 4"
increments. See the Rally Modifiers section for more information. Below is an
outline of leader ratings and their game related effects:
"-1" leaders - A "Minus One" leader is
either widely despised or dangerously inexperienced, and is probably viewed by
the troops as someone who is going to get them killed. His presence hurts more
than it helps, and he is probably in his position because he is either
politically connected, or a leader early in the war whose liabilities have not
yet been realized. Minus-one rated leaders only inflict their leader modifier
on units under their direct command.
"0" leaders - A "Zero" leader
is an average officer. He serves as a conduit for the transmission of orders so
that his divisions and other formations can function, and his personal
commitment and/or rapport with his troops is at a level that is expected for
the circumstances - middle of the bell curve.
"1" leaders - A "One"
leader is a cut above the rest and probably belonged to the top half of his
class (if he attended one). Class one leaders only give their leader bonuses to
units under their command.
"2" leaders - A "Two" leader displays
excellent abilities and is probably being groomed for higher positions. Class
two leaders only give all of their leader bonuses to units under their command,
they may also apply their rally bonus to units in adjoining formations of the
same corps.
"3" leaders - A "Three" leader is at the very top of the
command chain due to some combination of intelligence and personality. He
represents the cream of the crop of the officer corps, with an effective
combination of ability, management technique and bravery. Class three
commanders can give their rally bonus to all units of the same side, regardless
of chain of command.
"4" leaders - A "Four" leader is a famous and
extremely popular commander. They are rare and should only be assigned to very
special cases.
Leader classes - Are described as Energetic
(E), Proficient (P) and Cautious (C). The leader's class affects how readily he
is able to change formation movement and maneuvering during battle. See the
Leader Ratings page for a list of generally known leaders of the period and
what their classes and ratings are. Leader class can affect assaults and
maneuvering die roll results.
«2.3 Morale and Rallying
Morale
Conditions - During the game, units can suffer Morale Hits which
degrade their effectiveness and increase the chances that they will attempt to
spontaneously withdraw. The ideal unit condition is Formed, which
represents a unit fully under the control of its officers and able to perform
as ordered. Formed units have no morale hits. If one morale hit is suffered,
the unit becomes Unformed. If the unit has not rallied when another
morale hit is inflicted, it will become Rattled. If another morale hit
is suffered, the unit becomesShaken, etc.. Units can recover from morale
hits by rallying, but they may also suffer more than one morale hit at once.
Shown below are the possible morale conditions and their associated
restrictions.
Formed - Unit behaves
normally.
Unformed - Unit may not change formation.
Rattled - Unit may not change formation or deploy skirmishers. Infantry
will not assault artillery.
Shaken - Unit may not change formation, about-face
or deploy skirmishers. Infantry will not advance on or assault cavalry or
artillery and will not make All Out assaults against infantry (they may attempt
general assaults). Cavalry will not assault artillery or make All Out
assaults against other cavalry. Artillery will not move or
prolong toward an enemy.
Demoralized - Unit may not change
formation, about-face, deploy skirmishers or unlimber and will not voluntarily advance
toward any enemies. Unlimbered artillery is silenced. It may limber, but only
to move away from enemy units.Unit will suffer one panic hit for each
additional morale hit inflicted upon it by skirmishers and/or
artillery. Demoralized units which have assault moved during their turn will remain
demoralized, the "extra" assault disorder morale hit does not apply or convert
to another type.
Troop Grades - Every unit on the board will have a
Troop Grade which reflects its level of training and experience. The
Units and Formations page linked on the Republic home page includes common troop grade values for the best known
formations along with notes about their use for game play. Shown below is a
list of available troop grades:
Crack - These troops have the best
combination of training and experience. Unlike many others, they know
close-order drill with precision and are highly experienced with their weapons,
whether those be rifled muskets or their fists.
Veteran - These
troops have some warfighting experience or have been very well drilled and
trained. Either way, they will tend to get the job done.
Green -
These are men who have seen little or no action. They have received a full
round of training including close order drill, but under stress they might
still freak-out.
Untrained - These are men who have joined the cause
but have received almost no training, except possibly some minor drill. Most of
them have probably never loaded and fired a rifled musket, even at practice.
They may have been issued their first ammunition (ever) this
morning. Rallying - During the rally step of every command
phase, the attacking players must attempt to rally all of their units that have
one or more morale hits. To make a rally attempt, follow the sequence listed
below for each rallying unit:
- Take note of the rally table number that matches the
current condition of your unit. To do this, cross reference the troop grade and
morale status, this is your old rally number.
- Roll 1D10 and modify the result using the die roll
modifiers listed in the Rally Table on the combat chart. Apply the modified
result – positive or negative – to the previously noted old rally
number. The resulting value is your New Rally Number.
- Match the new rally number with the value on the
corresponding rally table line to which it is equal-to or greater-than.
- The morale rating listed at the top of the matching
column from step 3 is the unit's new morale status. Note that it is possible
for a unit's morale to improve, get worse or remain the same.
Example 1: A rattled green unit which
has suffered 25% casualties rolls 1D10 with a result of a 6. The 25% casualty
level modifies the result downward by two points (-2), reducing it to a 4. That
value is applied to the unit's starting value of 10 (the starting value for a
green, rattled unit will always be a 10). This raises the unit's value to a 13,
improving its morale level to unformed. If the die roll had been a 4, the
modifying effect on the starting value would have been a +2 for a morale
condition of 12, which would not have been enough to improve the unit's morale.
If the die roll had been a 1, the modified effect would have been a -1. This
would have reduced the morale condition to a 9, causing the unit to become
shaken.
Rally Die Roll Modifiers
- Ea. leader rating point - If the brigade's
divisional leader is still alive (not Hors de Combat), add his number rating as
points to the rally die roll, regardless of the leader's distance. If the
divisional leader has become Hors de Combat (presumed dead) and not yet been
replaced, subtract his number rating as points from the rally die roll. Zero
rated leaders obviously result in no modifier either way. If a corps or army
leader within the unit's chain-of-command is within 4" of the unit, his rating
may also be added. These ratings are cumulative and can add a considerable
rally bonus of all their values combined.
- Each 4" to divisional leader - Subtract one point
from the rally roll for each 4" beyond 4" distant that the unit's divisional
leader base is located, to a maximum of minus six points
(-6). This includes the bases of hors-de-combat
leader bases which have been moved to the rear pending replacement. Calculation of the 4" increments is rounded
up, so for example if the divisional commander is 9" away from the rallying
brigade, that is a -2 distance modifier.
- Percentage of unit lost - Subtract from the rally
die roll the percentage amount that corresponds to the unit's current losses
from base hits. Each damage to an artillery battery counts as having lost 20%
of its strength.
Replacing Fallen leaders - When a leader is rendered
hors de combat (out of action), the figure is moved to the rear of its
respective command and flagged with a Hors de Combat marker. That leader
base will remain out of action and unable to contribute to unit assault or
morale results until the Replace Leaders step during the controlling player's
next command phase as attacker, at which time base status is resolved as
follows:
Divisional leader - The original figure is retained and
resumes its original command at a one point reduction in rating from before, to
a minimum value of zero (zero level divisional leaders do not become a negative
value). Negative value leader replacements are a zero (which gives the troops
something to hope for).
Army/Corps/Column leader - The figure is removed from game
play. Its position is taken over by the highest rated leader available who is
ranked next in chain of command. The rest of the chain of command below that
level may also need adjusting, to the point that a fresh divisional command
figure may need to be supplied from off-board to fill the gap.
«
3 MANEUVER
There are two
aspects to this phase: Movement and Maneuver. Movement is done by individual
brigades as they march together toward a certain goal. Maneuver is the process
by which the divisions (that are made up of brigades) achieve their orders.
Orders in this sense being what the controlling player wants the division to
do.
| |
 |
| |
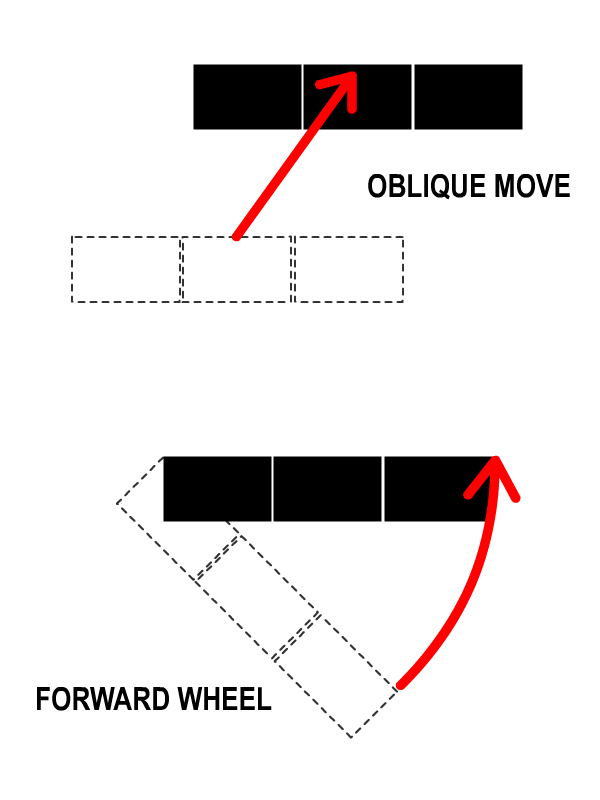
Figure 3.
Oblique
movement and wheeling. Note that the wheel is measured along the outside of the
wheel movement. |
«
3.1 Movement
Each of the major
troop types used for game play have movement allowances which represent
the total normal distances they are allowed to move during any one player turn.
These allowances are shown in the Movement Box on the Combat Chart. Normal foot
(infantry & foot artillery) and horse (cavalry & horse artillery)
allowances are 10" and 18" respectively. Infantry and cavalry units may also
use an assault (charge) movement bonus, any portion of which may be used during
the course of a turn's maneuver phase. Artillery may not use the assault move
bonus. Normal infantry and cavalry charge bonuses are 4" and 7" respectively.
This extra movement allowance permits a unit to cover a greater distance during
its turn, but use of any of the extra assault movement will also cause
the unit to suffer one morale hit (1M) at the end of the turn. It may be used for any purpose to press a unit forward, and may be used even if the unit will not be conducting an assault that turn. Players
conducting assaults are advised to mark unit starting positions to more easily
track remaining movement for breakthroughs and carrying positions (blank bases
work best). Leader bases move at the speed of charging cavalry (25").
A unit's movement allowance is based on forward movement as
measured from the front edge of its bases. Units may wheel (pivot) up to the
limit of their movement, and may move obliquely (diagonally) up to 45 degrees
from perpendicular (See figure at right). Reversing the facing direction of a
unit once does not count as a formation change, additional changes of facing
within the same movement phase do count as formation changes. All movement
penalties are cumulative.
«
3.2 Maneuvering
In order to move
and maneuver a brigade, the controlling player must roll 1D10 and consult the
Maneuver table to see which actions are available to the brigade for the turn.
The brigade's troop grade (untrained, green, veteran or crack) controls the
basic odds for the test, and once rolled, the player may employ any combination
of actions that the unit qualified for. Actions available to a brigade are:
Assault: This action allows a brigade
to advance and also enter into General or All Out assault range contact with
enemy formations. Units which do not roll high enough on the maneuver table to
qualify for this, might be able to conduct other similar actions, but they may
not voluntarily initiate assaults - at least not this turn.
Maneuver: A change in facing or
direction of advance by more than 45 degrees is conducting a Maneuver. This is
also required for a formation to refuse or advance a flank by more than 45
degrees, even if otherwise in a Hold status (except in cases of refusing a
flank as part of a mandatory assault result).
Advance: Allows a brigade to move
forward in the direction it is facing up to the limit of it's allowable
movement, but without entering into assault range. An advancing unit may change
the direction of its advance (i.e., maneuver) less than 45 degrees.
Hold: A brigade is on Hold if it is
completely halted. Brigades holding their position may change formation (if
able) or refuse a flank by up to 45 degrees, but must otherwise remain
stationary. Hold is the default state available to brigades who otherwise do
not pass for any other maneuver actions.
Pull back: Allows a brigade to move
backwards while facing the enemy or front lines (not facing its direction of
its movement). Brigades pulling back may not use the assault move bonus or
conduct Maneuver related changes of direction.
Conducting Maneuver - Brigades only need to
roll for a maneuver test if they will try to conduct an action other than Hold.
To check for other available actions, use the maneuver table column that
matches the brigade's troop grade and roll 1D10. Modify the die roll with the
corresponding die roll modifiers that appear below the table (see below for
modifier definitions). Any cross-indexed action value that the modified die
roll number is equal to or greater than may be used this turn. For example, if
a green unit's modified roll is a 3, it may advance, hold or pull back (or any
combination of those) but it may not maneuver or assault.
Maneuver Die Roll Modifiers
- Multiple brigades acting together = Add a
plus one (+1) to the die roll if one or more other friendly brigades within 2"
of each other are conducting the same maneuver action.
- Energetic division commander = Add a plus
one (+1) on the die roll if the brigade's divisional commander has an Energetic
rating.
- Each proficient leader within 2" = Add a
plus one (+1) on the die roll for each friendly proficient leader within 2".
Leader does not have to be within the brigade's direct chain of command.
- Each energetic leader within 2" = Add a
plus two (+2) on the die roll for each friendly energetic leader within 2".
Leader does not have to be within the brigade's direct chain of command.
- Each morale hit = Subtract one (-1) for
every morale hit currently on the brigade.
- Cautious division commander = Subtract one
(-1) off the die roll if the brigade's divisional commander has a Cautious
rating.
- Leader just replaced = Subtract three (-3)
if the brigade's division leader was replaced at the beginning of the
turn.
«
3.3 Forced Movement
Units required
to move according to a combat action or result will do so regardless of their
current turn status or movement allowance. These mandatory (forced) moves may
occur during the following conditions:
Movement Phase: Skirmish marker
evasion due to displacement by advancing enemy combat bases.
Artillery Phase: Due to morale hits on demoralized units
auto-converting to panic hits.
Assault Phase: Movement
required by assault results (panic hits) or divisional panic.
Forced retrograde movements such as rout, retreat and
withdraw are not subject to terrain penalties or formation restrictions and
will always be conducted out to the maximum distance required for that
mandatory order. If the mandatory move cannot be executed without direct
stacking of formations (two units sharing the same space) then the unit
conducting the mandatory move must execute the next move option down the list
(e.g. - A withdrawing unit stacked on another unit becomes a fall back in order
to clear to the rear of that other unit).
Disengage = Move 6" away from enemy,
facing enemy.
Withdraw = Move 8" away from enemy, facing
enemy.
Fall Back = Move 10" away from enemy, facing away from enemy.
Retreat = Move 12" away from enemy, facing away from
enemy.
Rout = Move 14" away from enemy, facing away
from enemy.
Mandatory advances - usually the
result of Assaults - may be conducted only to the limit of the moving unit's
available movement remaining from that player turn's Maneuver Phase. Forced
advances are in turn subject to cancellation by subsequent assault rounds that turn which
may change the assaulting unit's actions.
«
3.4 Movement Modifiers
- Rough Movement = Any unit with any of its
bases within rough terrain will pay double the normal movement cost. Double
normal movement cost means that each centimeter of distance moved under rough
conditions actually costs two centimeters of that unit's available movement
allowance for that player turn (see Terrain Effects). Units changing formation
in rough areas add 2" to their formation change cost.
- Artillery in Rough = Artillery bases and
other wheeled transport that are within rough terrain will pay double the
normal rough movement cost, which is quadruple cost. This means that each
centimeter of distance moved costs four centimeters of that unit's available
movement allowance for the turn (see Terrain Effects). Artillery battery
functions (limber, unlimber, etc.) are not affected by rough terrain.
- Trained Formation Change = Any
trained brigade (Green, Average, Veteran and Crack) subtract 1" from its total
available movement for the turn each time it changes formation.
- Each Battery Damage = Each
artillery battery subtracts 25% from its total available movement for each base
hit (damage) that it has suffered.
- Untrained Formation Change = An
untrained brigade subtracts 4" from its total available movement for the turn
each time it changes formation.
| |
 |
| |
Figure 4.
Options
for organizing brigade deployment areas on the battlefield, including advancing
or refusing flanks and extending fronts.
Click on the image for a full size
view. |
«3.5 Special rules
Infantry
Deployments: Flanks - Infantry brigades have numerous options for
organizing their battlefield deployment. They may for example, refuse a flank
(see Figure 4), which is done by angling end bases away from the front line.
This has the effect of moving the brigade's flank and rear zones away from the
enemy, thereby making it more difficult for an enemy to achieve an outflanking
attack. A brigade may refuse its flank up to ninety-degrees (90°) with any
number of bases. It may even refuse both flanks on the centerline, essentially
putting the formation into an arrowhead shape. Using the same method, a brigade
may advance a flank by angling bases forward (see Figure 4 at right). Note that
refusing flanks may place parts of a brigade (and therefore the entire brigade)
at risk of enfilading artillery fire. Other deployments such as Echelon
can reduce a brigade's vulnerability to flank assaults and flanking artillery
fire (flanking artillery fire may be denied the Deep Target modifier when
firing against a brigade "en echelon").
Infantry Deployments: Extending Fronts - Infantry
brigades may also extend their front by seeming to split into two groups that
remain within one base-width of each other. The two halves must remain within
one base width and may not break up into more than two groups. Both halves
continue to be treated as one unit, and any assault involvement by one section
automatically involves both sections. This option is usually exercised when a
brigade is outnumbered and forced to cover extra frontage to avoid being
outflanked. A friendly artillery battery may occupy the mid-brigade gap when
extending, otherwise no other friendly formations may occupy the gap when
extending.
Passage of Lines - Trained units (green, veteran,
crack grades) may pass through other formations without penalty once during
each move turn. If a second (or third) unit is passed through, the moving
formation may not use its assault move bonus that turn. Untrained units passing
through any other formation counts as rough movement for the moving unit.
Skirmishers - Trained brigades (Green or better
grade) may deploy their maximum allowance of skirmish markers at any time
during their movement phase. Skirmish markers must remain within 5" of their
parent unit. They may not be placed in a position which puts enemy bases
between them and their parent unit. In order to count as being in skirmish
order, friendly skirmish markers must remain at least 2" away from each other
(as measured between bases). Skirmish markers operating less than that distance
but greater than one base width apart are considered Packed Skirmishers.
Friendly skirmish marker bases may not operate at spacings less than one base
width (one base width is minimum spacing).
Skirmish markers must always surrender their positions (i.e.
- give ground) to close and open order enemy combat bases and if displaced have
the following options:
Fighting Withdrawal: If displaced by
enemy units which are not moving to initiate an assault against their parent
unit, the skirmish markers are only required to withdraw until the enemy units
have completed their move. If the enemy formation has its own screen of
skirmish markers, the skirmishers for both sides shall take up positions facing
each other approximately halfway between the opposing parent formations or - if
the defending skirmishers are at edge of cover or other major terrain feature -
the attacking skirmishers shall halt just short of the feature (e.g. -
advancing skirmish markers may not force defending skirmish markers from edge
of cover; only combat bases can do that).
Assault Actions: If displaced by
enemy cavalry which is moving to initiate any type of assault against their
parent unit, or an enemy infantry unit making an all-out assault against their
parent unit, the skirmishers shall immediately move out of the way as much as
is possible. They may flee to the flanks and attempt to maintain line-of-sight
to enemy bases if possible. If displaced by enemy infantry units making a
general assault, the skirmish markers may remain deployed between formations,
subject to the same rules outlined above in Fighting Withdrawal.
Cavalry Reaction - Cavalry brigades may react to
enemy units which advance to within 6" of their front (not flank or rear
as defined by the Flank and Rear Examples in Assault modifiers) during an
opposing player's Maneuver Phase. Reacting cavalry may dismount (if able) or
begin moving as soon as enemy units approach to within line of sight or 6",
whichever is less. Both sides then pro-rate their movement until the reacting
cavalry and enemy formations have either completed their movement, contacted or
approached within general or all-out assault range. Reacting cavalry may not
change formation, but it may conduct retrograde movement (away from the enemy).
Attacking players may not pre-measure distance from their units to enemy
cavalry units in order to avoid cavalry reaction, the check for reaction may
only occur when the defending cavalry owner declares the reaction distance
check.
Cavalry Mounting & Dismounting -
Mounted cavalry bases may dismount and operate as foot troops, and dismounted
cavalry may remount and operate as mounted cavalry. Mounting or dismounting
each counts as a standard formation change. To dismount, replace the mounted
cavalry base with the dismounted cavalry base, as aligned with the former front
of the mounted base being removed. To remount, reverse that process. Cavalry
may mount or dismount at any point during their movement, although in the case
of mid-move transitions, the movement may need to be pro-rated. In such a case,
the formation change movement penalty counts against the dismounted state.
Artillery - There are two types of movement for
artillery; Limbered and Prolong. Limbered artillery is horse
drawn, with the guns unmanned and unable to fire. Prolong is unlimbered, manned
cannon being manually dragged with ropes while in a fire ready condition. Guns
which have been disconnected from their horse teams and manned in place (ready
to fire) are called unlimbered. In order to accomplish both movement and firing
during the game, each artillery battery may execute several specific functions
during the course of a turn. The available functions are: Move, Unlimber, Fire,
Prolong and Limber. Artillery may conduct three functions each turn. For example; a foot battery may
move and unlimber during its movement phase and then fire on that turn's
fire phase, but batteries which move and fire lose simultaneous fire privilege against enemy artillery, they
suffer enemy artillery effects before they fire. If the example battery were to unlimber in place (without moving), it could fire
that turn while retaining simultaneous fire privilege against enemy artillery. Batteries may not use the same function more than once each turn
(i.e. - may not prolong twice during the same movement phase, etc.). Artillery
which prolongs also loses simultaneous fire privilege against enemy artillery.
Artillery batteries posted at normal frontages affect unit
pass-through (passage of lines) normally. Batteries posted at packed frontages block all movement
through their position (e.g. - other infantry, cavalry and artillery units may
not pass through a packed artillery battery).
| Terrain
Effects |
| |
Movement |
Cover
Rating |
Spotting
Depth¹ |
| Penalty |
Assault Move |
Impassable to: |
| Terrain Features
(penalty when within) |
| Light buildings (light stone, medium wood) |
- |
Foot only |
- |
1 |
2" |
| Medium buildings (medium stone, heavy
wood) |
Rough |
Foot only |
- |
2 |
2" |
| Heavy buildings (heavy stone & masonry) |
Rough |
Foot only |
- |
3 |
2" |
| Light forest, Orchard, Grove |
- |
Foot only |
- |
- |
1" |
| Medium forest |
Rough |
N/A² |
- |
1 |
1" |
| Heavy forest |
Double Rough |
N/A |
- |
2 |
1" |
| Marshland |
Double Rough |
N/A |
Artillery |
- |
- |
| Vineyard |
Rough |
N/A |
Artillery |
1 |
2" |
| Steep, rocky ground |
Rough |
N/A |
- |
2 |
2" |
| Ford |
Double Rough |
N/A |
- |
- |
- |
| |
| Obstacles (penalty to
cross) |
| River bank, Cliff |
Impassable |
N/A |
Artillery, Horse |
- |
- |
| Stream bank, Ravine |
-3" |
N/A |
Artillery |
- |
- |
| Stone wall |
- |
Foot only |
Artillery, Horse |
2 |
- |
| Entrenchment, Embankment |
- |
Foot only |
Artillery |
3 |
- |
| Treeline |
-1" |
Foot only |
- |
1 |
- |
| Hedge |
-1" |
N/A |
Artillery, Horse |
1 |
- |
¹ Spotting Depth is how far into that
cover a unit can be spotted and attacked with skirmish or artillery
fire.
² N/A means assault move bonus not allowed in or across terrain
feature. |
«
3.6 Terrain Effects
Battlefield
terrain will frequently affect a unit's ability to move freely around the field
of battle. The Terrain Effects section at right shows a list of common terrain
features and their effects on movement. Units may conform their front line to
local terrain such as hillside, edges of woods, blocks of buildings, streams,
etc. By contrast, units in the open must maintain their linear deployments
within the limits of the Formations section. When paying movement penalties for
moving through rough terrain, a unit continues to pay that penalty so long as
any portion of it remains within the terrain in question.
«
4 ARTILLERY &
SKIRMISHING
«
4.1 Skirmishers
Skirmish markers
represent dispersed infantry and sharpshooters who screen against enemy
skirmishers and try to spread disorder in enemy combat formations. Skirmish
markers block line-of-sight for friendly artillery, and skirmish marker
line-of-sight is blocked by all combat bases both friendly and enemy. Skirmish
markers within woods or buildings may project their 5" engagement range through
the terrain if they are not blocked by friendly combat bases or terrain effect
restrictions.
Combat - Skirmishers for the attacking player
attempt to shoot at and score morale (M) hits on enemy brigades. Skirmishers for the
defending player attempt to block the attacking skirmishers from firing at
defending units. This results in skirmish markers alternating between being the
attacker and being the defender as the turns change. Use the Skirmishing table
on the combat chart to resolve skirmish combat.
Defend (Block) - A defending skirmish marker
may attempt to block the closest enemy skirmish marker that is within 5" of it.
A blocked skirmish marker may not attack enemy combat bases that turn. To
attempt a defensive block, declare the defending marker and which attacking
marker it will try to block. Roll 1D10 and consult the Block column in the
Skirmishing table. If the die roll number is equal to or greater than the
number shown for the corresponding troop grade, the attacking marker is
blocked. Defending players must declare all blocking attempts before rolling
the dice. Multiple defending skirmish markers may attempt to block any one
attacking skirmisher.
Defensive Fire - Defending skirmish markers that are opposed (within 5") by enemy combat bases during the enemy player turn, may fire on those bases per the Attack outline above, if there are no enemy skirmish markers within the standard 5" engagement range for blocking actions. This is the one time that defending skirmish markers may conduct more than a blocking action.
Attack - Attacking skirmish markers not
blocked by defending enemy skirmishers may fire on enemy combat bases within
5". The attacking skirmish markers must have line-of-sight to their target and
may attack once per turn by rolling a 1D10 and referring to the
Skirmishing section of the combat chart for range limits and results.
Each successful attack will score one M hit on the targeted defending unit. If
the attacking skirmish marker is untrained or green and rolls a low number that
matches the Flee column results, the marker is picked up (it flees back
to the parent formation).
Skirmish bases cannot score M hits on other
skirmish markers but may, if unblocked and in range, fire at the parent unit(s)
from which the enemy skirmishers originate. All skirmish fire results take
effect at the end of the artillery phase (e.g. - skirmish and artillery fire
are considered simultaneous). Attacking skirmish fire effects are the same
against both close and open order targets.
«
4.2 Artillery Fire
During each
Artillery Fire step, artillery batteries for both sides may either fire on
enemy units or announce that they are saving their fire which may give a firing
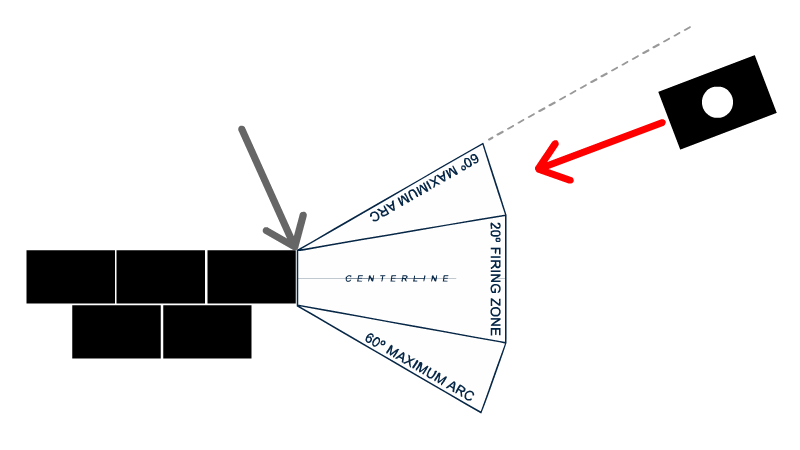
bonus on later turns. A firing battery has an effective arc-of-fire totalling
60 degrees measured from the outer front edges of its base (a free firing arc
is available on the Republique home page). In order to conduct artillery fire,
repeat the following sequence for each battery or group of batteries:
Step 1: Cross index the range column on the
fire chart that matches the target range, with the battery type (Heavy Rifle,
Medium Smoothbore, etc.). The result showing in the cell is your basic
effect.
Step 2: Apply the Range Column modifiers by moving the basic
effect one cell to the right or to the left per modifier point.
Step
3: Roll 1D10 and add or subtract the applicable die roll modifiers.
Step 4: If the modified die roll is a 10 or greater, move the basic
effect another two cells to the left. If the modified roll is a 9, move the
basic effect one cell to the left. If the modified roll is a 2, move the basic
effect one cell to the right, and if the modified roll is a 1 or less, move the
basic effect two cells to the right. Note that in many cases you will already
know if there are no column modifiers and you will go straight to the die roll.
If the die result is a very "middle" number like 5 or 6, you can quickly deduce
that the final effect is your original cross indexed value.
An artillery battery may only fire once each player turn
(twice each game turn), although fire is not mandatory. Limbered batteries may
not fire. Artillery may not fire through or over friendly units, including
skirmishers. All standard artillery fire conducted during the Artillery Phase
is considered simultaneous, and damage to batteries is applied at the end of
the artillery phase. The exception is prolonged/moved artillery, which can still
fire but loses simultaneous fire privilege against stationary enemy artillery
(see Artillery Movement).
Joint Battery Fire - Multiple artillery bases able to
fire at the same target at the same range, may group their fire to gain a
mass battery type effect, which increases the odds of scoring base hits
against targets. Joint battery fire uses the same sequence as normal
single-base artillery fire, with the added benefit of a "mass battery" modifier
reserved only for joint battery fire use (see Artillery Modifiers below). The
major difference is that the final modified result against the target is all
the damage the unit will receive from the entire mass battery. Unlike regular
single battery fire, the result shown is not from each base
firing.
Artillery bases may downgrade their range or fire weight factors
to participate in joint battery fire with other batteries. For example, if one
base is within 8" of a target and three other bases are within 10" of the same
target, the closer base may participate in the joint battery fire, effectively
downgrading its firing range to gain the benefits of the joint battery fire. A
base at longer range than the other three bases may not join (unless the other
three bases want to downgrade their ranges to the longer range). Another
example would be a heavy battery giving up its "H" weight in order to
participate in joint battery fire with a group of medium artillery
batteries.
Saving Fire - During the Artillery Fire segment, any
stationary artillery battery may be announced as saving fire. In order to save fire, the battery
cannot have moved during the current player turn, may not fire during the
current artillery phase, may not have any morale hits and must remain completely stationary. Place a saved
fire marker in front of the battery to represent its prepared status. The
next time that the battery fires, move the range column left by one – per
the table modifier – and remove the saved fire status. If a battery with
saved fire moves in any way, the saved fire status is lost (this
includes changing facing or prolonging). Each artillery battery may only
accumulate a maximum of one saved fire marker at any one time. Saved
fire markers may not be stockpiled or traded among batteries. Artillery which
is out of command radius may not save fire. A battery with saved fire status
receives a bonus if involved in an assault. Involvement in an assault causes
all participating batteries to lose saved fire status. (See Tactical Bonuses in
the Assault section). Batteries that are rattled or worse may not save fire and
will lose saved fire status upon becoming rattled or worse (keeping in mind
that all skirmish and artillery fire within a player turn phase is considered
simultaneous).
«4.3 Artillery Range Column Modifiers:
The artillery range column modifiers move your base fire effect to the
left (more effective) or right (less effective). Range column modifiers are all
cumulative.
- Deep Target - Move one range column to the left
if: A) The battery's center of fire passes into or through three or more
combat bases as measured from the leading edge of the target base to a depth of
4". The target bases do not need to belong to the same unit, but must all be in
open terrain and within natural (unmodified) effective artillery range, and/or
B) The targeted infantry unit is in square formation. The deep target modifier
is cumulative, so a firing battery can stack passing through three bases
with firing at square (also note that squares are considered enfilade
targets - ouch). The deep target modifier is not applicable to targets in
woods, buildings or on the far side of obstacles such as redoubts, heavy walls,
swamps, ravines or rivers.
Point Blank Fire - When firing on a
target in the first or second range bracket (2" or 4"), the deep target
modifier can only apply to the next range bracket out. For example: If the
range to a target's front is 1½", the deep target modifier is only
applied if the three base depth lines-up at less than 4" range, instead of
extending to 5½".
- Saved Fire - Move one range column to the left if
the firing battery successfully maintained saved fire status to the beginning
of the current artillery fire segment. For joint battery fire, all
participating batteries must have saved fire to use this modifier.
- Joint Battery Fire (per base) - Move one range
column to the left for each participating base in a joint battery firing group
(mass battery).
- At moving cavalry - Move one range column to the
right if over half of the artillery target is made up of moving cavalry bases.
To qualify as moving, the targeted cavalry formation must have moved more than
half during their last move opportunity. If on their last move opportunity
(including both regular move or breakthrough/overrun options) they did not move
more than half of their available movement, they are considered stationary for
purposes of artillery fire targeting.
Enfilade
Fire
The artillery battery in
this example is taking the targeted infantry brigade "In Enfilade." The battery
is within the arc-of- fire being used as an enfilade indicator (the same angles
apply to both enfilade exposure and artillery arc-of-fire). The target unit is
facing forward (top of page) and presenting its flank to the artillery. Note
the alignment (grey arrow) of the arc to that edge of the unit nearest the
artillery battery (drawing not to scale).
|
- At Medium or Heavy Cover - If half or more of a
target unit is in medium or heavy cover, move one or two range columns to the
right respectively (see defense classes under Assault). Also see the
terrain section for details about spotting depths and cover.
- If an artillery battery's center of fire is
closest to the uncovered base(s) of an otherwise covered unit, the battery may
fire without cover modifiers at the uncovered portions. In such cases where the
cover modifiers are not applied against the battery, enemy bases still in cover
may not receive base hits as a result of that fire.
«
4.4 Artillery Die Roll Modifiers:
Die roll modifiers are cumulative and may cancel each other out. For example,
firing at packed skirmishers from enfilade will gain a +3 for enfilade but a -2
for firing at packed skirmishers). The modified die roll only affects the final
artillery result if it is a 1, 2, 9 or 10.
- Enfilade Fire - Add three points to a die roll for
a battery firing in enfilade on any target bases. This applies to artillery
battery targets (packed and normal spacing), infantry targets, cavalry targets,
open order formations and packed skirmisher targets (fully deployed skirmishers
cannot be fired on by artillery). This means that a packed artillery battery
taken in enfilade with suffer both the results of the enfilade bonus on the
attacker's die roll, plus the double effect result from being a packed
artillery battery. Applies even if only portions (i.e., individual bases) of a
brigade offer an enfilade target.
- Each battery M and B hit - Artillery batteries
which begin the artillery fire step with morale and/or base hits will subtract
one point (-1) from the die roll for each hit (e.g. - a shaken battery with one
base hit suffers a -4 die roll modifier).
- At packed skirmishers - Subtract two points (-2)
from the die roll if the artillery targets are skirmish markers that are spaced
closer than 2" apart, as measured between base edges.
- At open order - Subtract two points (-2) from the
die roll if the battery is firing at an open order target.
- Passing Fire - Subtract two points (-2) from the
die roll if the artillery is conducting passing fire during the enemy movement
phase.
«
4.5 Targets
Main Targets -
Each artillery battery must fire at the unit which is; 1) the closest
infantry/cavalry or artillery threat, i.e. - the closest combat base(s)
occupying the closest artillery range bracket to the battery (infantry and
cavalry targets take priority over artillery targets) and; 2) closest to the
battery's Center of Fire. Different artillery bases may only converge their
fire onto one unit if these rules are not violated as a result or if a massed
battery is firing (measure from the centerline of each four-base mass battery
group to establish main target).
Secondary Targets - Secondary targets are units which
suffer collateral damage due to their close proximity to main targets. There
are two types of secondary targets: tandem and adjacent. Tandem secondary
targets may suffer damage both in place of, and in addition to the main
target. Adjacent secondary targets only suffer damage in place of the main
target. If both types of secondary targets are near a main target, an adjacent
target will only suffer hits if both main and tandem targets are
eliminated.
Tandem Target: A tandem secondary
target is any unit which is within the attacking battery's firing zone
and within 3" of the main target's front. Tandem secondary targets must also be
in open terrain. Secondary tandem targets always suffer half the number of
morale hits as the main target in addition to the main target's morale
hits. They also share approximately one-third of the total base hits
rolled on the artillery fire chart, always rounding down. If all bases in the
main target are killed, the unit in the tandem target position closest to
attacking battery center-line will suffer the balance of the required base hits
(if any).
Adjacent Target: An adjacent
secondary target is any unit within the firing battery's firing zone
which is next to, and within the same range bracket as, the main target. If all
the bases in the main target unit are destroyed as a result of one die roll and
there are no tandem targets, the adjacent secondary target closest to attacking
battery center-line will suffer the balance of the required base hits and
morale hits not absorbed by the original main target.
Compound Targets - If different unit types are
targeted as a result of either the Deep target or Secondary
target rules, use the modifiers most favorable to the battery. Enemy
artillery batteries which are positioned within 1" of each other may be treated
as single compound targets for purposes of artillery fire.
Firing zone - A battery's firing zone is a
cone-shaped area beginning at an artillery battery's front through which
battery fire is directed at targets. The firing zone is tapered outward 10°
and may be swung throughout a battery's 60° degree arc-of-fire. It must be
free of friendly combat bases (or any parts thereof) and markers in order for
the battery to be able to fire. The firing zone should not be confused with the
arc-of-fire, which is the stationary zone representing a battery's available
firing arc. The width of a battery's firing zone will match
its current frontage, either packed battery state (exact base width) or normal
frontage (double base width). The default assumption is if the battery has been
placed on the field with enough open space to either side to allow for normal
frontage deployment, that the battery has automatically used that space.
Declaring it in advance is good practice, but not mandatory.
Arc of Fire - A battery's arc of fire is a
cone-shaped area beginning at an artillery battery's front through which the
battery's firing zone may be swung in order to establish whether a potential
target can be fired upon. The arc-of-fire itself is tapered outward 60° and
is locked in a stationary position onto the battery front – it may not be
moved or swung into different positions in order to bring potential targets
into the arc. Half or more of one of a formations bases must lie within a
battery's arc-of-fire in order to quality as a valid target. The outer edges of
the arc-of-fire are marked "60° Maximum Arc" as emphasis of the limits on
the battery's effective field of fire. As with firing zones, a battery's arc of
fire will match its current frontage (packed or normal).
Line of Sight - A battery must have direct
line-of-sight to its target, it may not conduct indirect fire over obstacles,
friendly units or enemy units. Friendly units block light of sight for
artillery. See the terrain effects table for limits on spotting units located
within blocking features such as towns or forests. All of a mass battery's
individual bases must have a clear line of sight to at least one full base
belonging to the targeted formation.
Passing Fire - Artillery may conduct Passing
Fire at any enemy unit about to move out of the firing battery's
arc-of-fire (i.e., applies to artillery fire conducted during the opposing
player's movement phase). This applies to units passing completely through the
arc-of-fire or to units which were already within the firing arc at the start
of movement. Batteries saving fire may use passing fire with their Saved Fire
modifier applied. Those batteries which conduct passing fire may not fire
during that turn's artillery phase, and they do not receive saved fire as a
result of that missed phase.
Skirmisher Targets - Artillery may not fire on fully
deployed skirmish markers (markers with at least 2" between bases). If fully
deployed skirmishers are between an enemy battery and its target, they do not
mask or protect the target. Artillery may fire on packed skirmish markers. If a
skirmish marker itself is targeted (while "packed") and hits scored, the
M hits are passed directly to the parent formation who will continue to
sustain the skirmish marker screen. Each B hit on a skirmish marker
causes the Type rating for the skirmishers from that unit to go down one level.
For example, a unit with Veteran skirmishers who suffers a B hit
on one of its skirmish markers results in skirmishers for that unit dropping to
Green level.
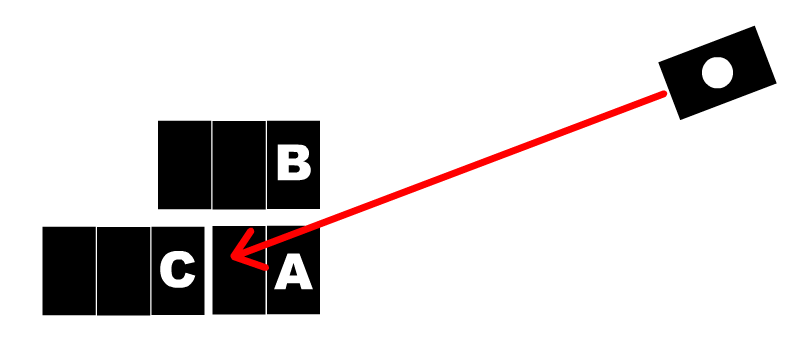 Secondary
Targets - At left are examples of both the tandem and adjacent secondary
target rules. The front edges of all example target units are within the same
range bracket, and unit A is the main target, with the artillery center of fire
passing through it. Unit B is a potential adjacent secondary target, and unit
C, whose front is – for this example – within 2" of the front of Unit
A, is a potential tandem secondary target. If unit A suffers either two or
three morale hits, then unit C will suffer one morale hit. If unit A suffers
four morale hits, then unit C will suffer two morale hits. If unit A suffers
three base hits, then it will be destroyed, and the unassigned base hit will
"carry over" to unit C, causing it to lose one base. If units A and C were
composed of only one base each and the same loses were suffered, their two
bases would be removed, along with one base from unit B, which is positioned
next to unit A and within the frontage zone of the firing battery. Secondary
Targets - At left are examples of both the tandem and adjacent secondary
target rules. The front edges of all example target units are within the same
range bracket, and unit A is the main target, with the artillery center of fire
passing through it. Unit B is a potential adjacent secondary target, and unit
C, whose front is – for this example – within 2" of the front of Unit
A, is a potential tandem secondary target. If unit A suffers either two or
three morale hits, then unit C will suffer one morale hit. If unit A suffers
four morale hits, then unit C will suffer two morale hits. If unit A suffers
three base hits, then it will be destroyed, and the unassigned base hit will
"carry over" to unit C, causing it to lose one base. If units A and C were
composed of only one base each and the same loses were suffered, their two
bases would be removed, along with one base from unit B, which is positioned
next to unit A and within the frontage zone of the firing battery. |
«
4.6 Artillery Fire Results
Target
units can suffer Morale (M) hits and/or base (B) hits as a result of artillery
fire, and may also indirectly suffer panic (P) hits.. Assign hits according to the target rules. Demoralized combat units which
receive M hits as a result of artillery fire will receive one Panic (P) hit for
each extra hit type suffered beyond demoralization. This includes units already
demoralized at the start of the artillery phase and units which become
demoralized during the phase. Any panic hits inflicted are still active for
purposes of division panic even if B hits completely destroy the unit in
question. As noted above under Skirmish Targets, skirmish markers which
suffer M hits will pass those hits on to their parent unit and B
hits due to artillery degrade quality of the unit's skirmish type.
Example: A rattled unit which suffers three M and
one B hit will become demoralized with one P hit added (due to the "extra" M
hit beyond demoralized). If the same unit started the artillery phase already
demoralized, it would suffer three P hits - basically all M hits would convert
to P hits at that point. Packed Artillery Target
- Artillery fire hits against packed artillery bases are all doubled; a
1M hit converts to a 2M hit, etc. This
happens in addition to any modifiers (enfilade, etc.) which had affected the
original result calculation.
«4.7 Hors de Combat and Panic
Conduct
the following tests – as required – after all skirmish actions and
artillery fire has been resolved. Because these tests can end up being
conducted twice during the player turn (once at the end of Artillery and one at
the end of Assault, as required), some rules noted below technically apply to
the Assault section.
Hors de Combat - Check for leader loss (hors de
combat); roll 2D10 for each leader who was within 4" of any unit that
suffered base hits during the phase in question. If a die roll is doubles (two
of the same number) reference the Hors de Combat table on the combat
chart to see whether the result is a casualty. Failure to roll doubles is No
Effect, he lives to fight another 40 minutes.
All die roll modifiers affect the individual doubles
numbers; for example if a player rolls a 5-5 for their leader who was near a
brigade that lost two bases, the 5-5 becomes a 7-7 because of the +2. If a
player does not roll doubles, the modifiers do not come into use because
non-double rolls cannot result in leader casualties. Checking for leader loss
is the only time in Republique when 2D10 are rolled to gain a result.
Hors de Combat Die Roll Modifiers:
- Each base hit (B) within 4"- Add one (+1) to the
hors de combat die roll for each friendly unit within 4" which suffered base
hits. The modifier is cumulative; add one point per base hit within range.
Applicable during both the Artillery and Assault phases.
- Enemy skirmish marker within 4" - Add one (+1) to
the hors de combat die roll if one or more enemy skirmish markers are within 4"
of the leader base. This modifier is not cumulative. Intervening combat bases
do not screen leader bases from skirmishers. Applicable during both the
Artillery and Assault phases.
Leaders rendered hors de combat are moved 12" from their
current position toward the rear of their respective command and flagged with a Hors de Combat marker. The leader (command) base will remain out of
action until the loss is resolved during the controlling player's next Replace Lost Leader step.
Panic Hits - Execute all involuntary movements as a
result of panic hits which occurred due to excess morale hits on demoralized
units. As with other panic hits suffered outside of the assault phase, any base
hits suffered in case of a Panic 4 event count as deserters and are immediately
removed. Do not check for divisional or inter-division panic at this time. For
pending assaults in which all targeted defending brigades route, retreat and
otherwise disengage, the attacking brigades may automatically carry the
position.
«
5 ASSAULT
« 5.1 Assault
Procedure
This phase represents the volley fire, melees, charges
and countercharges which occur in the confusion of close combat. When moving
into assault contact with an enemy formation, the attacking player must decide
whether to conduct a General Assault or an All Out Assault (see
below). In both cases the assaulting brigade(s) must be facing toward the enemy
formations and they must declare the target unit(s) that they have the greatest
contact frontage with as the primary defenders. Primary attackers and defenders
count all of their bases toward the assault strength total, and they block
assault activity for units behind them. To be considered within assault range, the front
edge of at least one full base of the attacking unit must be within the assault
zone boundary (i.e., there must be the appearance of solid contact). This
contact frontage within the assault zone is called the
contact face.
Skirmish markers do not interfere with
assault proximity and do not apply their bases to the assault. Solo artillery
batteries (artillery without accompanying infantry or cavalry that is within
assault range) on the attacking side do not by themselves initiate an assault.
Both general and all-out assault windows extend into and through all cover
types.
 |
| Assault Contact - Diagram showing the All Out
Assault and General Assault zones, which extend 2" and 4" respectively from the
face and forward flanks of the formation. The outward angle of the zones are
5º per side, which is the same as the artillery firing zone. |
General Assault: Attacking formations approach to
within 4" of the defending enemy formation, but greater than 2" range. They may
initiate the assault from this distance per the steps outlined below.
All Out Assault: Attacking formations approach to
within 2" of the defending enemy formation. They may initiate the
assault from this distance per the steps outlined below, which triggers the
following additional actions: a) Add an extra +1 to the assault modifier for friendly
E or P class leaders within 3" of the attacking unit (for a total bonus of +2), b) The
modified die roll loser of the All Out assault suffers a one line "bump"
outward (away from the zero line) on the assault results table. For example, if
a winning attacker scores on the 8,9 line against the defender, the results
bump up to the 10,11 line. If a losing attacker scores on the -5,6 line, the
results bump down to the -7,8 line.
Each assault is resolved in the Assault section of the
Combat Chart as follows:
Step 1: Establish which assault table to
resolve the action: Attacker Advantage, Pitched Battle or Defender Advantage.
Each table column includes brief outline descriptions of applicable conditions
for using each (see Assault Tables below).
Step 2: Each player adds
all applicable assault modifiers for their formations and applies them to the
result of one ten sided die roll (players roll 1D10 each).
Step 3:
The attacker then subtracts the defender's modified result from his own to
arrive at the die roll difference.
Step 4: Refer to the die
roll difference values shown in the corresponding assault column located in the
combat chart's Assault table. High rolling attacker values (defender loses)
force results that are above the zero line and apply to the defending units.
Low rolling attacker values (attacker losers) force results that are below the
zero line and apply to the attacking units. The results in the middle of the
assault table force either a break-off or re-roll of a second round.
Step 5: Immediately apply the resulting panic and base hits to the
involved units. All initial assault rounds must be resolved before re-rolls and
breakthrough overruns are carried out. Mark breakthrough locations before
moving on to resolve other assaults.
Step 6: Without re-rolling
either dice, do another die roll comparison using only the natural
(unmodified) die roll results. The side which loses the natural die
roll (regardless of whether they won the modified roll) will suffer morale hits
based on the difference between the two natural die roll results. Those M hits are applied to the losing unit(s) based on ratios
associated with the troop grade posted in the Assault Modifiers column. These
morale hits will always round down in the ratio calculation, so for example if
the loser's point difference is a 1 or 2 with a
veteran unit (three die points per M hit), the unit still receives no M hits. It would have to roll a full three point difference for a morale hit to
be scored.
Below is a brief outline of the four types of win and lose
combinations that can exist, and what they mean to the assault participants:
Win/Win – Unit won both the
natural roll for morale hits, and modified roll for general assault
results.
Lose/Lose – Unit lost both natural roll and
modified roll.
Win/Lose – Unit won natural roll but lost
the modified roll. Often means the unit was pushed back, but suffers no morale
hits. Infers a grudging, voluntary pullback.
Lose/Win –
Unit lost the natural roll but won the modified roll. It may have "won" the
assault, but the men's morale still took a hit due to the stiff
fight.
Step 7:Leaders which have been near units that
suffered base hits in the current assault round (see combat chart for actual
distance) must roll for hors de combat.
Step 8: After the first round of
assaults is resolved, conduct all breakthrough movements and other mandatory
moves (if any) required by the assault results. Then repeat steps 1 through 6
for any additional assault rounds which need to be resolved.
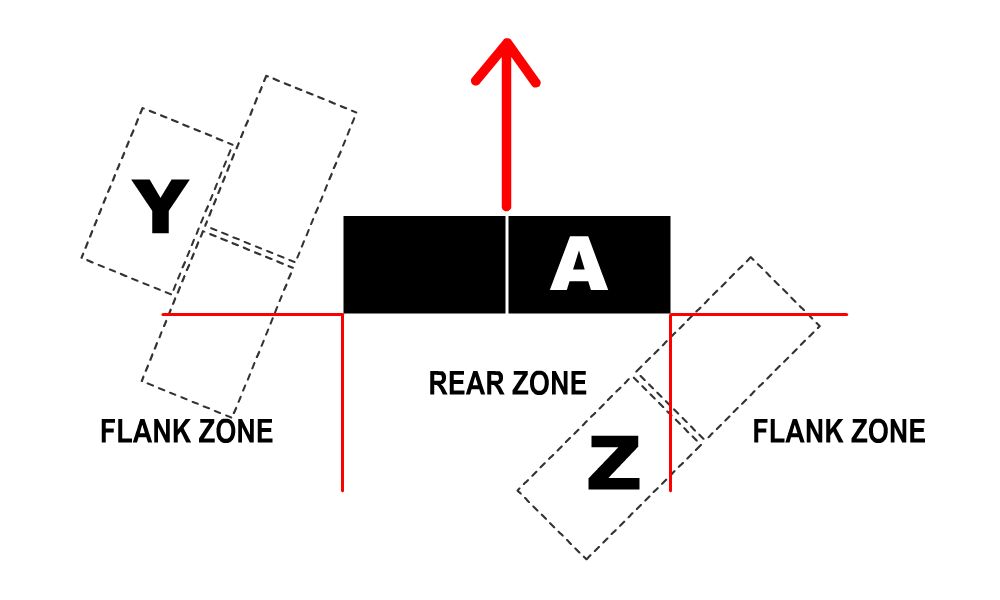 |
Flank and Rear Examples - The
flank zone for unit A is described by a line that runs along the rear of
the front bases, parallel to the unit's front. The rear zone is
bounded by lines running to the rear from the outer rear base corners,
perpendicular to the unit's front. Unit Y is in a flanking position because
part of one of its bases is past the flank line for unit A. Unit Z is striking
in the rear because part of one of its bases is past the rear line for unit A.
Units struck in both the flank and rear will only suffer the worst of the two
effects, not both.
|
Example: Attacker Unit A is a veteran infantry
brigade. Defender Unit B is an average infantry brigade. Both are in the open,
so the assault column used is Pitched Battle. Unit A rolls a natural 8 and Unit
B rolls a natural 3. After die roll modifiers, the A to B modified difference
is 9 to 3, which is an attacker win by six points to inflict three panic hits
(3P).
Unit B also lost the natural die roll by five points, and being an
average unit it suffers one morale hit for each three point difference in the
natural die roll (rounding up), resulting in two M hits. If Unit B had
lost the natural die roll by three points, it would have received only one
M hit.
Follow-up Assaults - Some assault results may trigger
several rounds of assault rolls. As long as defending enemy units continue to
face the attacking unit within the attacker's all-out assault zone (not the 4"
used to trigger the initial assaults) they will continue to trigger new
assault rounds. This would apply whether or not the assaulting unit(s)
conducted carrying of position, breakthrough, etc. Assault contact is only
broken when the attacker is no longer facing enemies within All Out assault
range.
«5.2 Special Rules
Mixed
Assaults - If some attacking regiments advance to the All Out Assault
range, while adjoining friendly units participating in the same assault remain
at General Assault range, this is called a Mixed Assault. Mixed assault
attackers cannot use the +2 All Out bonus for E or P leaders within 3" (They
may still use the standard +1 bonus). If a regiment defending against any
assault type is supported by a friendly defending unit that has bases partly or
wholly within the attacker's assault zone, and which are not blocked by other
friendly bases, the defender may apply only those supporting bases (not
the entire unit) toward the overall strength total. See Supporting Units under Assault Results.
Vacated Defense - Attacking units which were in
assault range of enemy bases, but rendered out of assault range due to
artillery or skirmish fire related enemy withdrawals or base losses, may expend
the balance of their available normal or assault movement (if any) to advance
or establish assault contact with fresh assault targets. Such moves may not
violate existing divisional maneuver limits (a holding division's units may not
move more than 4", etc.). Players intending to resume movement for qualifying
units must declare so at the start of the assault phase, and all such movements
must be completed before assault resolution begins. Units continuing movement
like this may not advance into the active field of fire of friendly artillery
(batteries that fired into that zone this player turn).
Bridging Formations - When an attacking unit is
facing in assault contact with two different enemy formations as part of a
broader assault involving numerous brigades, the attacking player may choose to
split that unit's participation into two different assaults instead of allowing
that one bridging formation to combine the greater group into a large
and potentially unwieldy assault calculation. The following factors must be met
into order to split a bridging formation for participation in two different
assaults:
- The attacking unit's base split must correspond as much
as possible to the boundary between the two defending assault blocks.
- Only the attacker (phasing player) may split units. The
defender for the turn may not.
- The bridging formation must respond to assault results in
a way which will preserve the unit's integrity – it may not split up. For
example, if one assault result calls for a bridging unit to advance and the
other calls for the unit to fall back, the unit must fall back in order to
preserve its integrity.
- Panic and morale hits on bridging units are not
cumulative. Only the worst single cases per assault round will apply, although
the worst cases for each type (panic, morale, etc.) may originate from
different assaults. For example, if one assault inflicts 2M and 2P on the
attacking force and another assault inflicts 3M and 2P on the other attacking
force, a bridging formation split between the two assaults will receive 3M and
2P.
- The attacking player is not allowed to pre-calculate the
various possible odds and modifier combinations for an assault before declaring
whether a bridging formation (if present) will or will not be split. The
decision must be made based on an brief examination of the final unit
dispositions at the end of the maneuver phase and should not take more than
thirty seconds.
Artillery - Artillery bases cannot solely be used to
trigger an assault as an attacker, however they may end up counted in assaults
either as defenders, or combined with attacking infantry and/or cavalry bases.
Within these limits, each limbered or unlimbered artillery battery within
assault range of an enemy unit counts as one combat base in the same manner as
an infantry or cavalry base. A massed artillery battery (several batteries with
bases touching) counts as one unit, with each base also equalling one regular
combat base. Unlimbered artillery attacked by a breakthrough assault may not
fire at the assaulting units, however if they did not fire on the current
player turn, they receive a +2 on the assault die roll as Fresh Artillery (See
Assault Modifiers). If it is a single battery it may
re-face up to 45º to bring attacking bases into its arc-of-fire. Massed
batteries may not re-face, but member batteries at each end which have not
fired this turn may re-face up to 45º to bring attacking bases into their
respective arcs-of-fire.
Open order vs Close order - When an open
order brigade is in assault contact with a close order brigade (See the
Formations section for more information), the open order brigade is
automatically considered disadvantaged. This means that if the open order
brigade is the defender, the assault switches to the Attacker Advantage table
(regardless of cover); if the open order brigade is the attacker, the assault
resolution switches to the Defender Advantage table. This only applies to
infantry and cavalry opponents. If opposed by artillery in either normal or
packed frontages, the open order brigade is not disadvantaged; normal assault
column selection applies.
| Cover Points
|
| Points |
Type |
Terrain Type* |
| 3 |
Heavy |
Heavy
buildings
Redoubt
Entrenchment
Embankment |
| 2 |
Medium |
Medium
buildings
Heavy forest
Stone wall
Steep, rocky ground |
| 1 |
Light |
Light buildings
Medium
forest
Vineyard
Hedge
Treeline |
«5.3 Assault Tables
Players use one
of three different Assault tables to resolve an assault. Both sides of
an assault round must use the same table column, each of which is tailored to
resolve specific conditions:
- Attacker Advantage - This table punishes losing
defenders more quickly and allows attacking cavalry the possibility to overrun
the defender. Attacker/Defender combinations who should use this table include:
1. Cavalry (mounted) assaulting the flank or
rear of infantry, which would include other foot troops like dismounted
cavalry.
2. Cavalry assaulting mounted infantry.
3. Cavalry assaulting
artillery (limbered and unlimbered).
4. Infantry assaulting dismounted
cavalry.
- Pitched Battle - This table resolves assaults at
rough parity and causes morale hits when the modified results tie.
Attacker/Defender combinations who should use this table include:
1. Same vs Same: infantry vs infantry, cavalry
vs cavalry, etc.
2. Other. Any assault combinations that do not obviously
fit into either of the other assault types are summarily treated as Pitched
Battle.
- Defender Advantage - This table allows for the
defender to inflict punishing casualties on the attacker. However if things are
not looking good, the defending troops will tend to try escaping to avoid being
trapped. The attacking troops might just let them and be satisfied with driving
them away. Attacking cavalry however, might still end up overrunning the
defenders if things don't go to plan. This can be a treacherous column to roll
on. Attacker/Defender combinations who should use this table include:
1. Any troops in the open assaulting troops in
cover.
2. Cavalry assaulting the front of an infantry brigade (including
dismounted mounted infantry).
3. Mounted infantry (while mounted)
assaulting infantry and/or mounted cavalry from any direction (front, flank,
etc.).
Column selection may end-up being averaged-out by the mutual
cancellation of two competing options. For example, if infantry in the open is
attacking dismounted enemy cavalry in cover, the attacker advantage of infantry
vs dismounted cavalry would be negated by the defender advantage of in-open vs
cover, resulting in a Pitched Battle resolution.
«5.4 Assault Modifiers
The following
modifiers are added to or subtracted from the assault roll to complete a
modified assault roll. For optional assault rules, see the assault section of
the Advanced Rules page.
- Troop Grades - Attacker and/or defender add or
subtract the corresponding troop grade modifier if the greatest percentage of
bases present are crack, veteran, average, green or untrained grade troops
respectively.
- Morale Hits - Attacker and/or defender subtract
the corresponding minus modifier from the die roll if: a) Over half of the
bases in assault contact belong to units with morale hits, or b) the greatest
percentage of bases present belong to units with morale hits.
- Repeater equipped - Attacker and/or defender add
four points (+4) if half or more of involved bases are armed with repeating
rifles or carbines. Does not apply to units with single shot breech-loading
weapons.
- E or P leader within 2" - Attacker and/or defender
add one point (+1) for each friendly proficient or energetic leader within 2"
of any participating brigade. This modifier is cumulative, multiple leaders
within 2" will each add a point. For attacking units conducting All Out assaults, this modifier
is doubled to a +2 each.
- Ea. cover point - Attacker and/or defender add 1,
2 or 3 points to their die roll if the greatest percentage of bases present
(rounding up) qualify for one of the cover bonuses outlined at right.
- Each fresh artillery - Attacker and/or defender add
two points (+2) if any participating unlimbered artillery bases facing the
assault have not yet fired this turn (does not count for batteries flanked, hit
in rear or limbered). This will commonly be defending artillery caught up in a
follow-on breakthrough assault round.
- Outnumbering Ratio - The combatants with the
lesser number of bases will subtract from the die roll if the outnumbered ratio
is equal to or greater than 3:2, equal to or greater than 2:1, etc. Defending
units assaulted in the flank or rear may not inflict outnumbered modifiers.
- Each recent B and P hit - Attacker and/or defender
subtract one point (-1) from their die roll for each of their own combat bases
lost from participating units so far during the current player turn. This
includes bases lost to artillery fire in the preceding phase this turn. Also
subtract one point (-1) for the maximum number of panic hits suffered so far
during the current assault phase by the single worst-case participating unit.
This will typically be troops fighting second or third assault rounds after
having suffered panic hits. Players should not total the sum quantity of panic
hits for all participating units.
- Each 1/4 skirmishers out - Attacker and/or
defender subtract one point (-1) from their die roll for each one-quarter of
available skirmish markers that are deployed. As with other modifiers, this
only applies if affected units make up half or more of participating
bases.
- Outflanked - Defender subtracts four (-4) from the
die roll if a third or more of bases present are from outflanked
units (if assaulting unit finishes its move to assault with any part of
its bases past the defending unit's flank line). Void if target is hit
in rear. Units in buildings are not considered to have a flank (e.g. -
outflanked modifier does not apply to them, even if functionally outflanked).
Note that this is one of the only modifiers that can happen when less than half
of the involved bases are affected.
- Attacked in Rear - Defender subtracts seven (-7)
from the die roll if a third or more of bases are from units being assaulted in
the rear (assaulting unit finishes its move to assault range with any part of
its bases past the defending unit's rear line). This includes units in
buildings, which can be hit in the rear.
«5.5 Assault Results
Hits and
Losses - Both attacking and defending units may suffer morale hits, base
hits and panic hits as a result of their involvement in a general or all-out
assault. All results for each round of assault combat are applied
simultaneously, as are the mandatory movements which may be required.
Morale hits - All units which lost the
natural die roll in an assault round will suffer the number of morale hits
called for by the assault chart results and are immediately marked with the
corresponding morale hit (M Hit) markers to show their new condition.
Additional assault rounds (if any) are executed with modifiers adjusted for the
new morale condition. M hits to demoralization cause a panic hit (P hit) for
each additional M hit point beyond demoralized. This occurs whether the
demoralization just happened or already existed previous to the assault phase.
The resulting "converted" P hits are combined with any standard P hits suffered
as a result of the assault die rolls (if any) and used to resolve the unit's
panic response. Note that this may result in the apparent victor of an assault
pulling back if their existing morale combined with any converted P hits
happens to require it. War is hell.
Base hits - Base (B) hits inflicted due to
assault results are first distributed evenly among infantry or cavalry units
which were within closest contact with the enemy units. Bases lost are removed
immediately from play, and before surrender results are applied. If possible,
base hits should be removed from the middle of a unit in order to avoid biasing
established assault contact (unit may close bases at end of phase). Artillery
bases are considered a separate type, and experience base hit (damage) in
addition to the infantry/cavalry units. Example: A defending infantry brigade
and two artillery batteries jointly lose an assault with a 1B hit. The infantry
suffers one base loss, and one of the artillery batteries also suffers one base
hit (which is a damage hit for artillery). In the case of numerous base hits on several different
units and troop types, roll dice to randomly decide where the hits go (or
players may quickly agree among themselves where to assign the
hits).
Panic Hits - Panic hits control how units
respond to their assault loss. Each panic hit counts as one panic level, so
three panic hits is a Panic 3 or P3. To find a unit's panic response, refer to
the corresponding panic level in the Panic Index (panic levels are 1, 2, 3 or
4) and cross reference the troop grade of the losing units with that panic
level's result column. The result shows the type of mandatory retrograde
movement which the losing unit must conduct, either D (disengage), W
(withdrawal), F (fall back), Re (retreat) or Rt (rout). Cavalry is similarly
affected, moving 200% of the distances listed for foot. Units that rout will
suffer an additional morale hit at the end of their rout move, if already
demoralized the unit remains demoralized.
Surviving artillery batteries
may limber-up in order to disengage, withdraw or fall back. Batteries required
to retreat may also limber-up, but each suffers one damage point (base hit).
Artillery batteries required to rout are abandoned (captured/lost) regardless
of other results.
Assault related panic hits are totalled at the end of
each assault round. If a brigade begins the assault phase demoralized and then
suffers 3P as a result of the modified assault roll, and 1M as a result of the
unmodified morale check, that 1M will convert to a panic hit due to the unit
already being demoralized. This means that the unit suffers a Panic 4 and any
related effects (retreat, rout, etc.).
Direction - Units will conduct
their panic hit movement in the following order of preference: 1) Directly away
from the enemy threat. 2) Directly toward friendly lines. In some cases a unit
may end up moving away at an angle that is an average between these two options
(Example: If outflanked, a retreating unit may angle away from the threat as it
attempts to return to friendly lines). If friendly formations are directly to a
unit's rear, it will pass through those formations (if movement distance
warrants it) in the process of executing their panic hit movement.
Group Surrender - A unit which is
unable to execute its panic hit movement without passing through an enemy
formation (e.g. - it is surrounded and/or pinned against an obstacle) will
conduct the following actions by troop grade: Elite units will overrun the
enemy formation and return to friendly lines at the cost of one base hit (1B).
All other troop grades will surrender.
|
P a s s t h r o u g h E f f e c t
s |
Loser
Retrograde |
Inf/Art
Loser (3") |
Cav
Loser
(6") |
| Fallen back |
0P |
2P |
| Retreated |
1P |
3P |
| Routed |
2P |
4P |
| Results
field in the table shows P hits suffered by units which had friendly formations
to their front fall back, retreat or rout through them. |
Lose/Lose passage of lines -
Units
that suffer lose/lose assault results with P hits which then pass through
friendly formations to their rear (as measured from front edge to front edge of
each formation) may end up inflicting P hits on those units behind them. These
pass through hits only happen with the three worst retrograde moves of
Fall back, Retreat and Rout. Infantry and artillery losers will affect units
within 3" to their rear (as measured between closest points between units) and
cavalry losers affect units within 6" to their rear. Infantry losers passing
through a massed artillery battery affect a maximum of one battery, cavalry
losers passing through a massed artillery battery affect a maximum of two
batteries. Minimum overlap required for this effect is one full combat base of
the unit being passed through. Consult the table at right for specific P hits
by loser type.
Loss Number - The panic result may
also include a loss number, which represents the number of bases taken
prisoner as a result of the assault. Losers required to surrender prisoner
bases will do so only after base hits have been removed. Prisoner bases are
taken first from all-out assault contact units of the lowest troop grade
present, followed by higher troop grade bases within the all-out contact range
bracket. Only if all bases in the all-out contact zone are lost may remaining
unassigned prisoners be taken from general assault contact units. If a unit is
completely destroyed during the course of the assault phase, the parent
division must still check for panic (does not apply to a unit destroyed during
the artillery phase, even if that unit was already in assault
contact).
Example: A veteran grade unit suffers two panic
hits as a result of an assault. The controlling player will refer to the second
line of the Panic 2 index column (the second line corresponds with the
Veteran troop grade units). The result column indicates a W,
meaning that the unit would withdraw without further loss. If the unit had been
composed of untrained troops, it would have received an Re result, which
would result in one retreat move.
Carry Position - Attacking formations allowed to
carry a position may advance into all or part of the position originally taken
up by the enemy unit(s) before their retirement. Carrying a position allows a
unit a certain amount of latitude to adjust their orientation, but only if they
have enough movement allowance remaining. This includes any limbered artillery
involved in an assault, which may also participate in a move to carry a
position including unlimbering in support of other friendly formations.
Officers of all grades which had been within 2" range to support the assault
may also accompany the unit to its new position.
Troops carrying a
position may deploy or pull in skirmish markers if that does not violate other
game or scenario rules (skirmish markers that attacked a enemy bases may not be
pulled in). They may also conduct a single retrograde pivot of up to 45º
in order to refuse their flank to an imminent threat or to improve alignment
with adjoining friendly units. Troops required to carry a position by
the assault result must, if necessary, use their assault bonus move to achieve
the move. If an enemy position was under fire by friendly artillery during the
turn, the friendly artillery is presumed to cease firing when the friendly
formation carries the enemy position.
Drive Away - Attacking formations hold their last
position that triggered the assault without carrying the enemy position. This
will leave the vacated enemy position empty.
Breakthrough - Assault results may either allow or
require attackers to continue moving deeper into enemy lines (usually to
attempt more assaults) which is called a breakthrough. While conducting this
continuing movement, they are subject to normal movement rules and may initiate
new assaults against units. They may not violate or exceed their current orders
while breaking through, nor may they exceed their maximum movement allowance as
measured from the start of their movement phase. Units whose assault results
state that they must breakthrough will move to the limit of their full
assault movement unless countermanded by a new assault result. Cavalry required
to conduct breakthrough movement are not obliged to assault enemy
held towns or woods and may deviate their movement as much as required to avoid
such actions. Units which use their assault movement bonus will suffer one
morale hit at the end of the turn.
Units which may breakthrough
have the option of downgrading their breakthrough option to a carry
position result. As with the Carry Position result, friendly artillery is
presumed to cease firing when a friendly formation conducts a breakthrough move
across a zone previously being fired through that turn (i.e., the artillery
fire from earlier in the turn does not present a threat to the friendly
units).
Overrun - An overrun allows assaulting cavalry to
break past or through a nearly defeated defender and to continue moving into
assault contact against potential assault targets to the rear. The cavalry may
continue assaulting units in this manner as long as it has the available
movement and continues to achieve assault results allowing further movement and
action. Cavalry which remains in all-out assault contact range (2") with an
enemy unit due to refusal to conduct the overrun must conduct further assault
rounds until the all-out contact is broken. If no enemy units are within range
of a cavalry unit's remaining movement allowance, the cavalry may still overrun
the initial defender and expend movement to the maximum allowable as part of a
general penetration of enemy lines.
In cases where an enemy unit suffers panic hits that keep
it in the path of an overrunning cavalry formation – especially in cases
where the cavalry runs out of available movement – a second assault round
may result. This can give the effect of a prolonged running down of the
panicking defenders.
Break off - Allows attacking cavalry or infantry to
withdraw or fallback out of assault contact range with the enemy. This results
in one additional morale hit on the unit(s) that break-off. If the unit
breaking off contact is already demoralized, its retrograde move turns into a
retreat, with backs to the enemy.
Units unable to withdraw, retreat or rout away from the
enemy without coming in contact with other enemy combat bases will surrender.
All breakthrough, break-off and overrun moves are carried
out after the first assault round is completed. Subsequent assault rounds are
conducted in the same manner.
Stalled Assaults - Assaulting units which have
insufficient remaining movement to execute carry position, breakthrough or
break-off results are stalled. Stalled units shall still conduct further
assault rounds against their opposing enemy formations until they are no longer
facing within the 2" All Out assault range of each other.
Supporting Brigades - Units which had a minority (less
than half) of their strength involved as supporting bases in a nearby assault
defense may be negatively effected in case of a defeat. If the primary defender
disengaged, withdrew or fell back facing the enemy, the supporting regiment may
refuse its flank to accommodate a new alignment that stays clear of the
attacker's assault contact zone (to avoid automatically triggering more assault
rounds). If the primary defender retreated or routed out of the assault, the
supporting brigade suffers one morale hit (1M) and must conduct a disengage,
withdraw or fallback move (player's discretion). Units with half or more of
their strength involved as supporting bases suffer the same morale and panic
hits as the primary defender (morale hits may need to be recalculated against
the natural die roll if the supporting unit is a different troop grade).
«
5.6 Death and Disorder
Hors de
Combat - Roll 2D10 for each leader who was within 4" of any units which
suffered base hits. Definitions for the hors de combat die roll
modifiers appear in the Leader Death and Panic section of
the Artillery & Skirmish Fire phase.
Charge & Retreat Disorder - Units which use any of
their assault bonus movement (also known as charge movement) or which routed
during the turn will suffer charge disorder at that turn's end. Units
suffering charge disorder suffer one morale hit, but only after all assaults
are resolved. If a unit is already demoralized, no extra morale hits can be
added, the unit remains demoralized.
End of Phase - At the end of the assault phase, both
sides gather any remaining bases killed during the phase and close ranks of
units which have suffered base hits by moving their bases back into contact.
Units may close ranks on the center of the unit, to the left or to the right,
so long as one unit base remains as the stationary anchor for the rest of the
closure.
«
6 PANIC TEST
« 6.1
Panic Test Procedure
Panic tests are conducted at the end of a
turn by any divisions with units that have suffered panic level four (P4)
events during the course of the player turn. These panic tests use the same
table as the panic hits which can happen during the assault phase, but in a
slightly different way.
In order to conduct a divisional panic test, cross-index the
average troop grade of the testing division with the pass column on the
Panic 4 section. Once the pass number is established, the player rolls 1D10 and
modifies the result using the panic die roll modifiers. If the modified die
roll equals or exceeds the pass number, the division does not panic. If the
modified die roll is less than the pass number, the division is immediately
marked as being in a panicked state and all member units will conduct the
resulting forced movement listed immediately to the left of the fail column
(fall back, retreat or rout). No morale hits are added to units due to a failed
divisional panic test, however if a division routs, all member units will
suffer one morale hit at the end of their assault move away from the enemy
(already demoralized units suffer no further morale or panic hits because of
this, and in most cases any demoralized formations will have already conducted
their forced retrograde move for the turn). As of the completion of their
retrograde move, divisions which have panicked are considered to be in a
holding state for purposes of movement and maneuver.
Units within the division which have already conducted other
forced retrograde moves during the current turn's assault phase will only move
enough to match the new mandatory move result. For example; if a unit had
already conducted a Fallback out of an assault and it's division then panics
and routs, the unit will conduct the extra retrograde movement that reflects
the difference between the Fallback and Rout result (for infantry in this case,
it would involve turning backs to the enemy and moving an extra 4" away from
the enemy and/or toward friendly lines). Unless his base is currently flagged
as hors de combat, a division's leader may move as needed to keep his position
in the middle of the division.
If a loss number is shown to the right of the panic
result, the division will lose that number of bases to desertion (this is a
dual-purpose table, so this same loss number is used during the Assault phase
to indicate bases captured as prisoners). Deserting bases are taken randomly,
first from the lowest troop grade present, followed by progressively higher
troop grades within the division. Deserted bases are removed from game play and
not returned unless playing multiple-day scenarios. Once all panic test rounds
have been resolved, all panic markers are removed from affected divisions,
panicked division orders are reset to Defend status and the next player turn is
begun.
«
6.2 When to Test
There are two
conditions which can trigger divisional panic tests; internal panic and
adjoining panic (division near to it panics). If both happen at the same time,
roll one die (1D10) for each condition and take the one worst result that
occurs. Because panic test failures can trigger panic tests in adjoining
divisions, the panic test phase is conducted in "rounds" during which
progressive groups of divisions may roll for panic. All panic tests conducted
within a test round are considered to be simultaneous, and resulting mandatory
movements are executed only after all necessary die rolls for that round have
been conducted.
1) Internal Panic - A division will
roll for panic if any of its units suffered panic level four (P4) hits during
the assault phase. Note that if the unit(s) which experienced the P4 hit were
entirely destroyed, deserted or captured, the division still reacts to the P4
event. Units which suffer various panic hits that total to five or higher
without experiencing a P4 hit do not count toward this test.
2) Adjoining Panic - A division will
roll on the panic level four column if any adjoining division within 3" becomes
panicked during the Panic Test Phase. Divisions are considered adjoining if the
closest points of their closest units are within 3" of each other, or within
line of sight, whichever is less.
Each division may only test once for each panic condition
during the course of a panic phase. For example; if a division passes an
internal panic test, only to have an adjoining division fail a similar
test, the subject division must then roll an adjoining panic test. If
however, it passes that panic test only to have a different adjoining division
panic on a subsequent round (tests in any one round are all considered
simultaneous) it will not have to do a second test.
«
6.3 Panic Modifiers
Panic Die Roll Modifiers: The following modifiers
increase or decrease the failure die rolls:
- Rolling division is unshaken - Add two points (+2)
to the panic die roll if the rolling division is unshaken.
- Each extra demoralized unit - Subtract two points
(-2) from the panic die roll for each demoralized unit present. Destroyed and
surrendered units still count if they were last demoralized.
Panic Base Hit Modifiers: The following modifiers add
base hits to the existing loss numbers. All base hit modifiers are cumulative
(e.g. - Routing out an assault in the rear, out of a town and across a bridge
results in four bases taken prisoner for an average unit).
- Retreat/Rout - Add one base hit
(B) to the loss number for the following conditions:
Unit is retreating or routing out of: Town terrain (blocks, buildings); across
bridges or fordable streams or is retreating/routing away from an assault in
the rear.
|
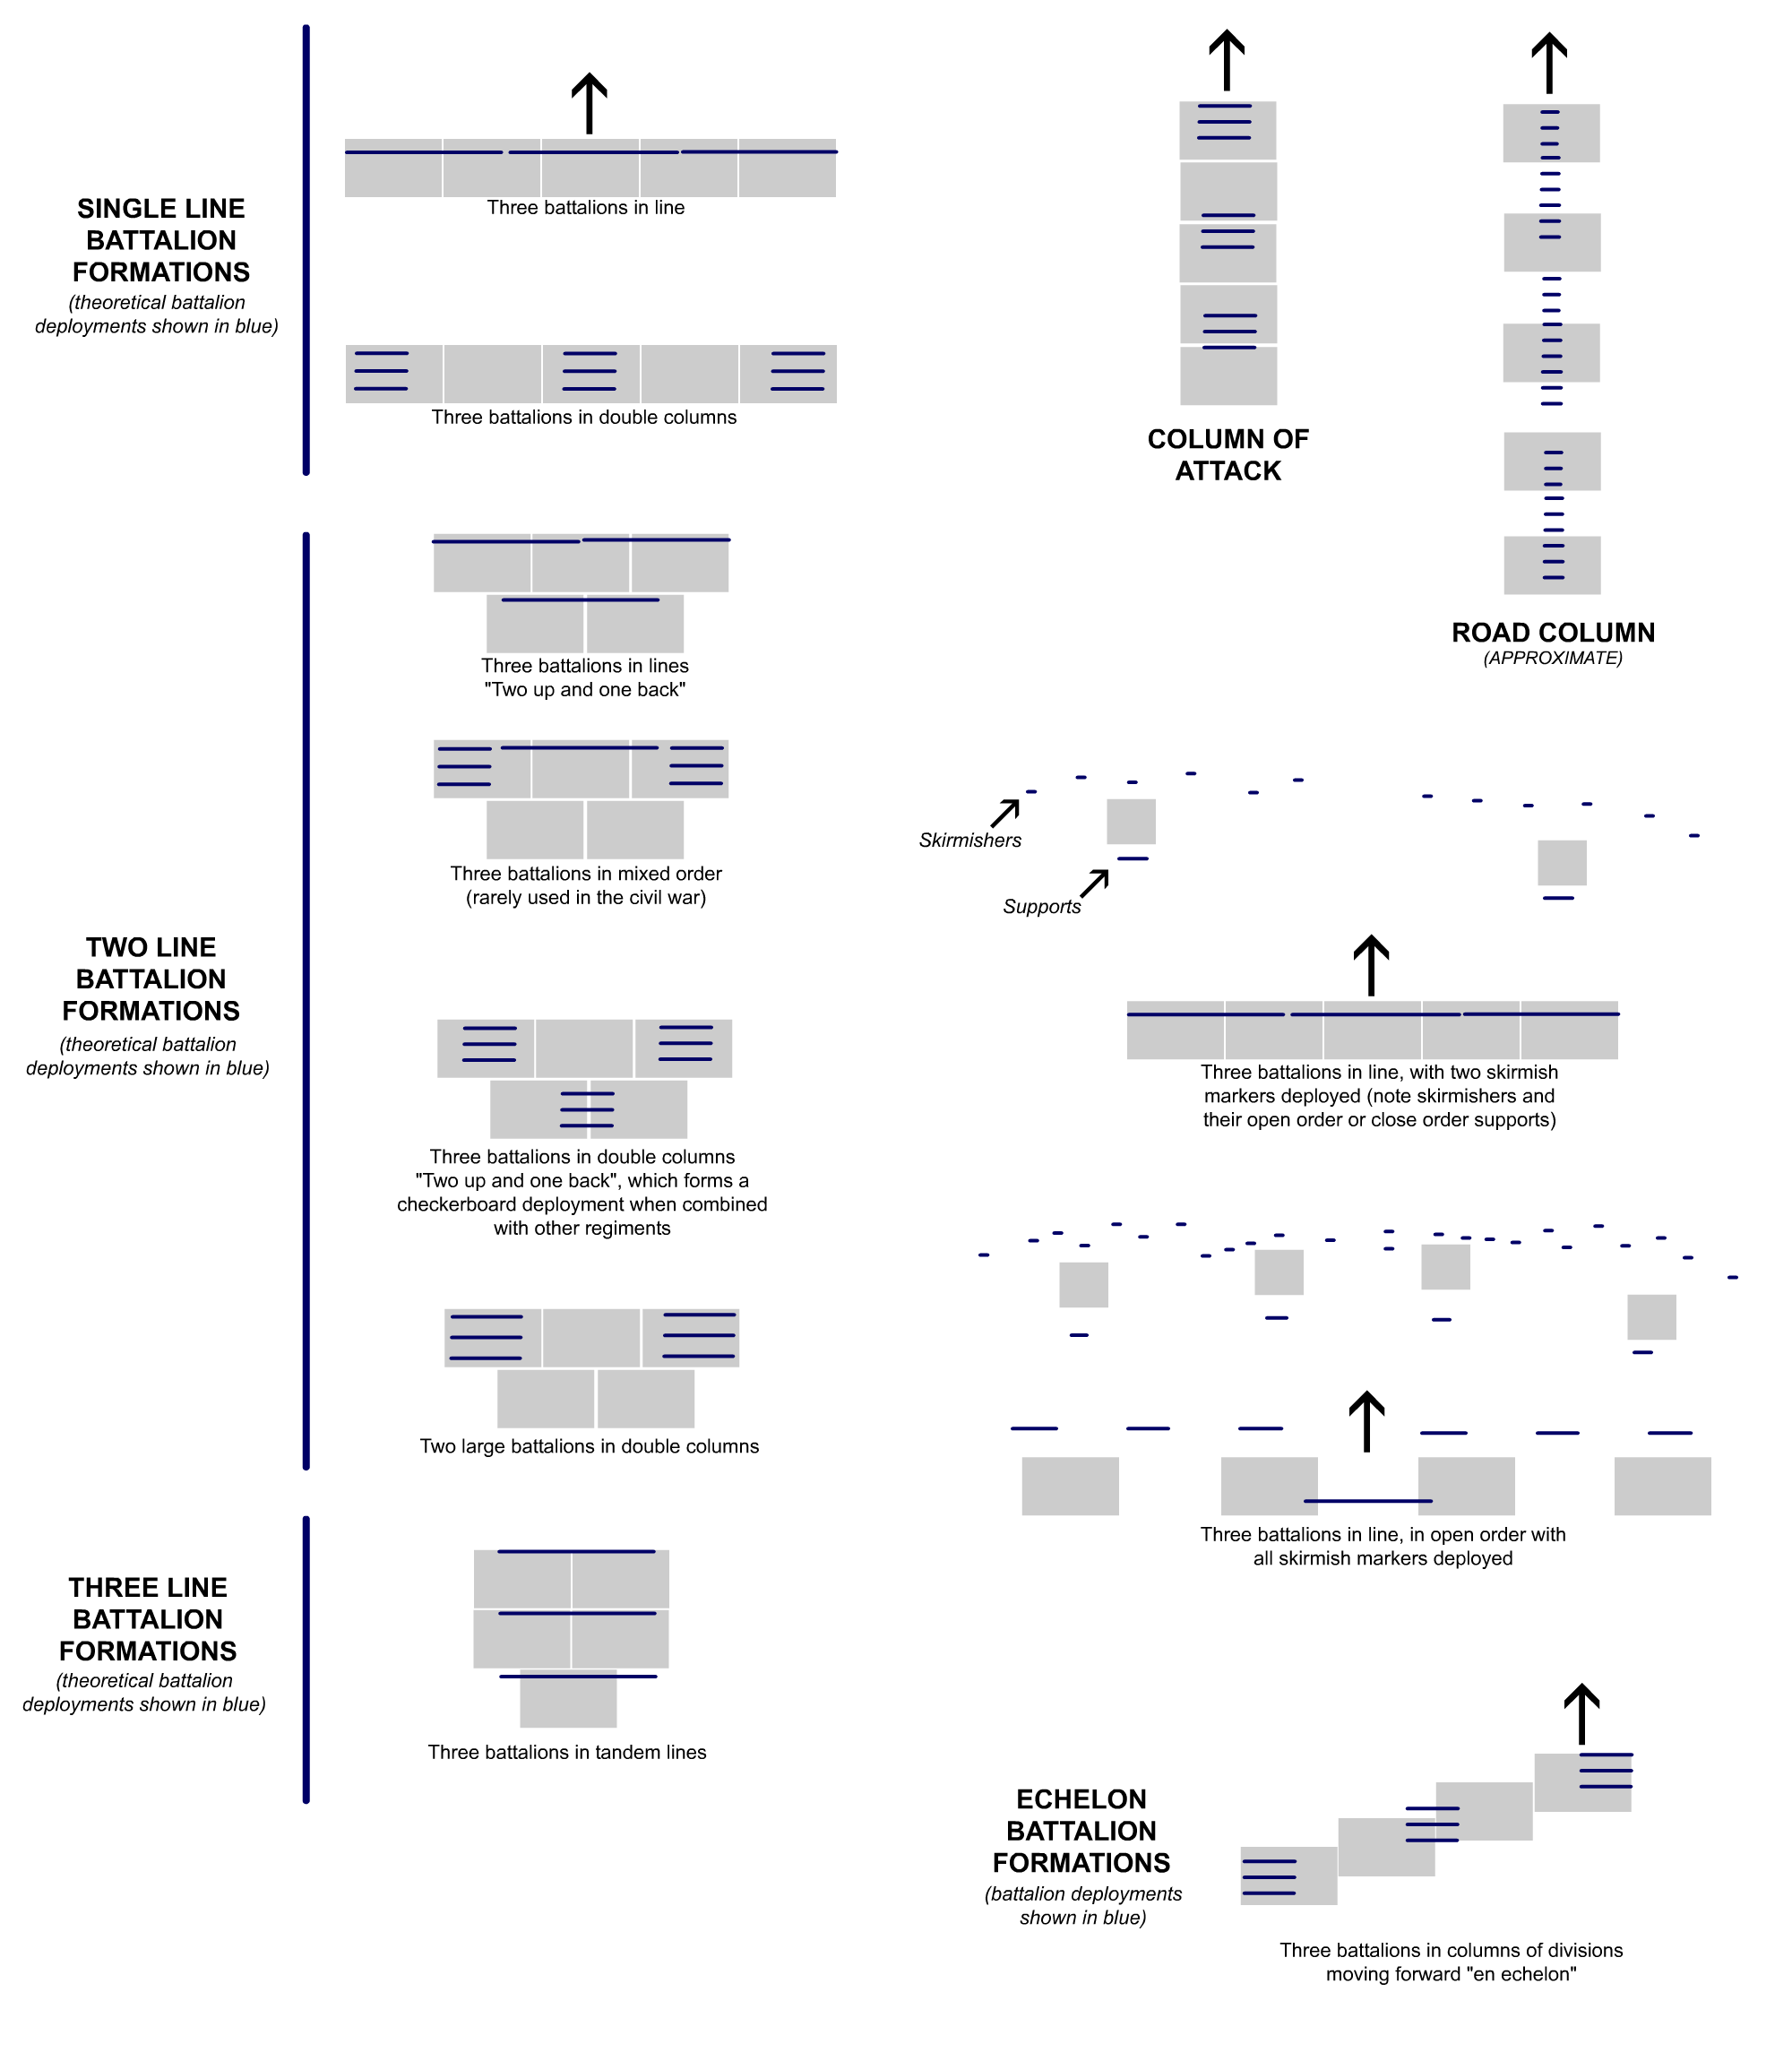