|
Battlefleet 1915 is an alpha version World War One of the
Battlefleet 1900 rules for predreadnought era naval combat. In Battlefleet,
many of the possibilities and realities of this time can be recreated, with
your abilities having a direct effect on the results. During game play, your
own range estimates of the actual enemy miniatures are used to establish hits
and misses - not unlike real life, where correct and skillful use of the
available fire control systems depended on the men manning them. Hence,
personal skills of the fighting fleets become a tangible factor as you try to
keep your ships afloat and in fighting trim!
| GAME SCALES |
| |
Small |
Medium |
| Recommend Scale |
1/6000 |
1/2400 |
| Measurement Format |
Metric |
Imperial (inches) |
| 1 kilometer |
85mm |
10½ inches |
| 1 nautical mile |
157mm |
19½ inches |
| 1000 yards |
78mm |
9½ inches |
| Each range bracket |
50cm |
5 feet |
| Maximum gun range |
150cm |
15 feet |
| 1 turn |
Three Minutes |
« 1.1 Game
Scales
Battlefleet can be played in one of two different scale
formats; small and medium. The small format uses metric measurement and is
designed for use with 1/6000 scale naval miniatures, allowing games to be
played on a dining table. The medium scale format is imperial (inches) based,
and is designed for use with 1/2400 and 1/3000 scale miniatures, which usually
requires a large playing area. All scale ship speeds for these formats have
been pre-plotted on the Master Scale Chart, which
covers most speed ranges needed for Battlefleet ship logs.
« 1.2 Mounting
& Figures
There are many different scales of ship models
available for use with Battlefleet. xxxxxxxxxxxxxxx
 |
| Above: The four zones
of a ship. The front and rear arcs are 60 degrees across, centered on the
fore/aft line. Any vessels being fired upon by guns from within their front or
rear arc may only use the second of their two armor values. |
Mounting - Small scale vessels should be mounted on
bases for ease of handling. The Battlefleet mounting standard for 1/6000 scale
is ½ x 11/8 inches (13mm x 30mm). Most
play-testing for Battlefleet was conducted using this scale, and within the
rules text, the term "vessel," "model" or "ship" also applies to any base upon
which that model might be mounted.
Each model has four zones into
which it is divided; a front, a rear and two beam zones. These zones are used
to establish whether a vessel is being "raked" or not during the fire phase.
Note that the front and rear arcs are not referred to as bow and stern arcs in
order to prevent confusing their definitions with those of the arcs-of-fire of
weapons. See Figure at right.
« 1.3
Equipment
Naval wargames are a bit more technically demanding than
some other forms of miniature wargaming and require a few extra tools. The
standard gaming equipment of tape measures (metric or standard), 12 sided dice
and pencils are definitely required. Players will also need to download the
Battlefleet Combat Chart, Ship Log, Gunnery Log and Arcs sheet. Cutting out the
arcs-of-fire and turning circles and mounting them on thin cardboard will give
them extra strength. A clipboard is also valuable for writing on the ship and
gunnery logs.
Combat Charts: Each player should have a copy of the
Battlefleet Combat Chart, which can be downloaded off of the Battlefleet page
in the WTJ Games section. There are two halves to the combat chart, a front and
back. Both sides are needed for game play, and include turn sequence, gunnery,
torpedo and damage charts. For related overviews of each section of the chart,
see More About Combat Charts, which
includes step by step illustrations of the charts.
Ship Logs: Each vessel used in combat will need to
have an entry in one of the ship logs. These entries are used to track
available speed, weapons and damage to each vessel. The information shown in
the Ship Values listings on the Battlefleet page has all the information needed
to fill out the ship logs for those vessels. For more detailed explanations,
see More About Ship Logs.
| TURN SEQUENCE |
- 1) Command
- Players issue basic movement orders for the
upcoming movement phase and attempt to send messages or order requests to other
commanders.
- 2) Movement
- Players simultaneously move their ships according
to the basic movement orders issued during the Command Phase.
- 3) Ranging & Gunnery
- Players simultaneously guess ranges to enemy ships
and record them on their gunnery logs. All ranges are then marked as hits or
misses.
- 4) Torpedo Launches
- All torpedo launches are declared and any resulting
hits marked.
- 5) Damage
- a) Check for ongoing fire and flooding
effects.
- b) Resolve hit damage.
- c) Attempt damage control.
- d) Test for sinking and uneven flooding
effects.
|
Gunnery Logs: Because Battlefleet uses a range
estimate system to control gunnery, players use Gunnery Logs to record their
range estimates. Each log contains two four-ship sections (most navy divisions
are composed of four ships), along with a command line at the far left of each
division. At the top of each gunnery log column, record the name of one ship.
In the columns below, record salvo targets and hits. The boxes along the top
edge of each division are for recording command arrows during times when
vessels are not firing salvos and/or out of range. These spare command boxes
eliminate the "wasting" of range boxes during preliminary maneuvers.
« 1.4 Turn
Sequence
Once all players have filled out their ship and gunnery
logs, placed their ships and arranged their formations, game play is ready to
begin. Each phase of the turn sequence is conducted by both players
simultaneously. At right is an outline of each turn sequence and its basic
elements:
« 2.0
COMMAND
During the Command Phase, players issue orders for the
upcoming Movement Phase. There are two types of orders; Divisional and
Fleet. Divisional orders are recorded in the far left command column of
the gunnery chart and apply only to the ships within a division, which are
assumed to be under orders to follow the lead ship of that division. Fleet
orders are written on small "post-it" style message pads and used for any
communication between players.
« 2.1 Divisional
Orders
If a division commander wants his ships to move in any
direction other than straight during the upcoming movement phase, he must order
them to do so in the Command Column of the Gunnery Log. Divisional orders are
recorded as small arrows, which are drawn in the direction and approximate
bearing which the commanding player wishes to move them. Refer to the examples
below for the available division orders:
| Turn-in-Succession - A
turn-in-succession is drawn as an arrow using a single line. Only divisions
deployed in line-ahead may use the turn-in-succession order. Ships turning in
succession will maintain their line ahead formation while turning on a
stationary pivot-point. Vessels which will turn less than 45° during their
movement do not need to use a command arrow. Vessels which will turn between
45° and 90° during their turn use the 45° arrow, and vessels which
will turn 90° or more during their movement use the horizontal arrow. Note
that the arrows are direction specific. If a player draws an arrow pointing
left (to port), then the division must turn in that direction during their
movement. The Turn-in-Succession figure at right depicts a 90°+ turn in
succession to starboard as executed by ships in a line-ahead formation. |
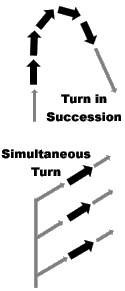 |
 |
|
| Simultaneous Turn - A
simultaneous turn is drawn as an arrow using two lines. Each vessel in a
division ordered to turn simultaneously will individually turn in unison in the
direction ordered. Vessels not in line ahead formation will always use the
simultaneous turn command. If a turn-in-succession order is accidentally given
to vessels not in line ahead, the command will be treated as if it were a
simultaneous turn order. Note that if a division is in line abreast, only
certain simultaneous turn commands will allow a return to line ahead. |
 |
A division must execute its turn orders at the very
beginning of its move. If, once it has fulfilled the minimum requirement of its
order, it has remaining movement, it may continue moving straight on its new
bearing, or execute further multiple orders, if any (see multiple orders). If a
vessel is ordered to execute a turn which it cannot fulfill even by using all
available movement, it will complete as much of the turn as possible.
Stopping - Writing a dot or small filled-in circle on
the command line of a division will order it to use the turn's movement phase
to stop dead in the water. Vessels under a stop order must still move their
minimum required movement for the turn, at which point they are considered at a
complete stop.
Multiple Commands - Divisions with sufficient
movement allowance may be issued multiple commands. Multiple commands will be
executed in the order in which they are written, reading from left to
right.
Transfer of Command - Division flagships which have
suffered damage may have to transfer their command status to other ships within
their division. There are two basic conditions under which this occurs;
voluntary, and involuntary.
Voluntary: If a player's division
leader has suffered damage which endangers the ship, he may want to transfer
flag status to another vessel in the division. Division flagships which have
not suffered conning tower hits may transfer their command to another vessel in
their division by slowing to no faster than 1/6 original speed and declaring
their transfer to any other qualified vessel which lies within 50mm (6 inches
large scale) and which is also moving no faster than 1/6 original speed.
Involuntary: If a division's flagship is suffering either a
steering or conning tower hit, the controlling player must roll for transfer of
command to other vessels. In this case the transfer requires no slowing of the
vessels, since it infers the assuming of command by another officer. Beginning
on the command turn after the damage occurs, roll one 12 sided die. If a
10 through 12 is rolled, the ship closest to the
flagship will assume command of the division (and of the fleet if it is the
fleet flagship). Double the die roll range if the damaged flagship has two or
more points of uneven flooding and/or five or more active fires at the time of
each die roll. For example: A flagship with a conning tower hit, six fires, and
three points of uneven flooding would automatically transfer command (doubled
for fires and doubled again for an obvious list). If the damaged flagship
"repairs" the steering or conning tower hit before another vessel assumes
command, then the original flagship retains its command status and any attempts
at involuntary transfer will cease. If a flagship blows up, or otherwise sinks,
involuntary transfer is immediate and automatic.
|
Hint for Small Battles
If two players share a division and they need to
communicate, they should also use the Fleet Order method. This is common with
smaller battles in which there may be no divisions. In these cases, each player
commonly controls only one or two ships which operate independently. Such a
situation existed at the Battle of Santiago Bay, during which few of the U.S.
ships, despite belonging to the same "division," demonstrated much coordination
of effort. In fact, there were several near collisions during the scramble to
engage the Spanish ships. |
« 2.2 Fleet
Orders
There are two types of fleet orders: Divisional and
Inter-Divisional. Divisional fleet orders are only required when the flagship
of a division is not located at the front of a line ahead. In this case, the
flagship must successfully roll a Send Message command in order to be allowed
to enter a movement command on the gunnery log. If the Send Message die roll
fails, the controlling player may not vary the course of the division from that
of the previous turn. Hence the wisdom of placing one's flagship at the front
of their line!
Inter-divisional fleet orders or "messages" are how
participating players commanding different divisions are allowed to communicate
with one another regarding battle tactics, instructions, etc. In order to send
an interdivisional message, a player will write a message on any small
"post-it" style sheet of paper, and then roll the Send Message die. If the
player succeeds in rolling a 7 through 12, the message may be handed to the
player for which it was meant. If the die roll fails, no further messages may
be sent by the "sending" player during the remainder of that command phase.
Before 1903, players attempting interdivisional orders must also have a clear
line-of-sight between their flagships.
- Recommended Fleet Orders - Since many players are
often unsure of what to write, especially on a small square of paper, the
following small list offers a few ideas about what orders a commander might
want to issue to adjoining divisions of a fleet. Some are historical, and
others are merely the result of previous games:
- Engage Enemy: Normally issued to capital
ships such as battleships and cruisers. This order instructs all friendly
divisions to move as close as possible to the enemy, while keeping out of
torpedo range.
- Follow Me: This self-explanatory order was
issued several times historically by divisional commanders when a
commander-in-chief's ship was damaged or sunk. Commonly used when signalling a
general withdrawal.
- Torpedo Attack: Most commonly given to
destroyers, this was the signal to move as quickly as possible into effective
torpedo range and launch torpedoes.
- We Surrender: That's right, ships which
want to surrender must make that fact known to the enemy, which is done via
this command.
« 2.5
MOVEMENT
During every movement phase, each vessel may expend its
allotted movement allowance as shown in the propulsion boxes on the ship chart.
Vessels may only use the maximum speed shown by the highest undamaged box.
Propulsion boxes with temporary or permanent damage may not be used to
establish available speed (see propulsion damage). Maximum available speed
applies only to travel in a straight line. Turning will cause a ship to slow
down, thereby "using up" available speed points more quickly.
 |
| Turning - The turning
circle is held over the forward center-line of the vessel. Note that the rear
of the ship base swings away from the circle as the base is moved along the
periphery. The values shown on the metric circles are the amounts of movement
used to reach those points along the circumference of the circle. Each
increment on the large turning circle represents one inch of available movement
used. |
« 2.6
Turning
Turning circles are used during game play to recreate
both the minimum allowable turn radius of a ship and the loss of speed the
vessel suffers when turning. All Battlefleet turning circles needed for small,
medium and large scale formats may be downloaded from the Playing Aids section
of the Battlefleet page. Each circle is categorized according to the size of
vessels to which it applies, and is marked at 30 degree increments for small
and medium scales, and at "one inch" increments for the large scale format. As
a vessel "tracks" along the edge of the circle, it will swing around to its new
bearing, expending the appropriate movement points in the process. Ship bases
executing a turn are not limited to moving only in the turn increments shown.
The increments are for reference only, and players may stop at any point along
a circle's circumference by estimating the amount of available movement
expended to reach that position.
Note that because the turning
circles recreate a vessel's loss of speed while turning, the actual
measurements of the turning circle increments are always less than the amount
shown. This is planned, and not a problem with the circles themselves.
« 2.7 Changing
Speed
During each movement phase, vessels may change their actual
speed by the equivalent of two propulsion boxes worth of movement. The
Actual Speed is the amount of movement used by any one vessel on its
previous turn. This contrasts with maximum Available Speed, which is the
highest speed available to that vessel according to its propulsion ratings. For
example; if a vessel whose normal maximum speed is 120mm per turn moves only
20mm on any one turn, it would only be able to move a maximum speed of 60mm on
the following turn, an increase of 40mm, or two propulsion boxes worth of
speed. Note that destroyers only have three propulsion boxes, which gives them
the ability to greatly vary their speeds within a turn, although the fewer
boxes also make them vulnerable to power plant damage due to their lack of
redundant propulsion systems.
« 3.0
GUNNERY
Players begin the gunnery phase by establishing targets for
each of their vessels and then visually estimating the distance from those
vessels to their targets. The name of each target is recorded on the respective
vessel's gunnery log, followed by the controlling player's estimate of the
target's distance. Once all ranging is complete, players measure each range
estimate, marking its termination point with a white marker for misses and a
red marker for hits. The maximum allowable range for guns depends on the
game scale being used. Consult section 1.1
Game Scales for a list of all maximum range and range bracket
distances.
« 3.1
Targets
Vessels may fire upon one or more targets during their turn.
Each target must be recorded separately by name on the gunnery log, along with
the gun types assigned to that target and one range estimate for
that target (each vessel may only make one range estimate per targeted ship per
turn).
Line of Sight - Vessels may only fire upon targets which
are within their direct line-of-sight. Line-of-sight is drawn from the forward
smokestack of a firing vessel to the forward smokestack of a target vessel. The
potential target may not be fired upon if line-of-sight is blocked in any way
by other vessels, their bases, clouds of smoke or land.
Rates of
Fire - Each weapon has an inherent rate-of-fire (ROF) shown in the data
line of the ship log's armament section. The rate-of-fire is the number of
rounds per turn which each gun in each position may fire. A ½
value for ROF means that the weapon in question may only fire every other turn
due to their agonizingly slow loading technology. A 1 value means that
each weapon may fire once each turn. A 2 value for ROF means that the
weapons in question may fire twice each turn. The extra rounds fired due to a 2
ROF may be fired at different targets, although multiple gun positions may not
split their extra fire unevenly. For example: a two-gun 15cm turret may fire
two rounds at each of two other ships, or four rounds at one ship, but it may
not fire four rounds at four different ships, or three rounds at one and one
round at another. In this regard, single mountings are more flexible in their
ability to send up a curtain of fire at smaller vessels.
Gun Positions, Beam Patterns and Arcs-of-Fire - The
tables below show the major locations for individual guns positions used
throughout this period. There are two major locating systems: positions
and beam-patterns. ........... (old section
obsolete. New position chart required here)
« 3.2
Ranging
In order for players to fire salvos at an enemy unit, the
range between the firing unit and its target must be accurately guessed. In
most cases, this involves ship-to-ship firing, although in some cases land
mounted cannon will be firing at ships and visa-versa. In either case, the
successful guessing of the range to the enemy is required in order to have a
chance to score hits. In order to assign targets and guess ranges, players use
the Battlefleet Gunnery Log to record the name or names of each of their
vessel's target(s) and the estimated range to each of these targets. A vessel
may engage as many targets as they have firing positions, but they may only
guess one range per target. No pre-measuring of ranges is allowed.
Ranging Shots - Players may at any time conduct
ranging shots in order to estimate the distance to enemy vessels. A ranging
shot is a single maximum range round fired from a vessel toward any declared
enemy vessel. It is measured normally, and a splash marker is placed at its end
point. Ranging shots can never result in damage to an enemy ship, and their
range is not recorded on the gunnery log. A vessel may not fire normal salvos
on the same turn as ranging shots.
« 3.3
Measuring
Once all target assignments and range estimates are
completed, players measure the ranges for each assigned target to establish
whether the firing vessels estimated the correct ranges to their respective
targets. Ranges are measured along a line running from the forward funnel on
the firing vessel to the forward funnel on the target vessel. A hit zone
is achieved if the estimated range from the firing vessel's forward funnel
intersects with any part of the target vessel's base (while still maintaining
alignment with the target's forward funnel). If a hit zone is achieved,
mark the target vessel or its base with a red hit marker. If the estimated
range does not land on any part of the target base, the rounds for that turn
are considered too far away to have a chance of hitting, and a white "splash"
marker is placed at the incorrectly guessed range point.
Danger Zone - Add new text
here.
« 3.5 TORPEDO
FIRE
After all movement and gunnery has been completed, players may
conduct torpedo fire. All torpedo launches must be declared at the beginning of
the phase, and once declared, may not be canceled. Torpedoes fired are crossed
off of the firing vessel's ship log, and if necessary, a launch marker may be
placed next to the vessel's base on the launching side. For smaller games with
a limited number of launches, launch markers may not be needed. Due to their
relatively shallow draft, vessels of size 2 or smaller may not be targeted by
torpedo fire.
« 3.6 Launch
Arcs
The arc of fire for torpedo positions mounted on a vessel's
center-line is 95 degrees. The arc-of-fire for torpedoes mounted within the
side or end of a vessel is 60 degrees. In order to establish a 60 degree arc
for side/end mounted positions, use the 150 degree arc-of-fire card to
establish the blind zone for the respective positions. See the Arcs-of-Fire
page for examples.
« 3.7 Calculating
Hits
Measure in a straight line from the forward funnel of the
firing vessel to the forward funnel of the declared target vessel. The first
vessel touched by this line must roll on the Torpedo Hits chart. If a hit is
scored, place a torpedo-hit marker along the side of the vessel struck. The
torpedo is considered "destroyed" and may not be applied against any further
vessels. If no hit is scored, continue measuring along the same line to
establish whether there are any further vessels which intersect the line,
rolling for each in turn. The maximum range for a torpedo is one-half of a
range bracket [ possibly expand torpdeo range to one
range bracket... probably not though ] , measured from the launching
vessel's forward funnel. If a launched torpedo reaches its maximum range
without detonating against a vessel, it is considered destroyed and is
eliminated from play.
- Torpedo Hit Modifiers:
- 50% Speed Differential - A vessel firing a
torpedo will suffer a -1 modifier to the torpedo hit die roll if
its speed is half or less than the speed of the targeted vessel.
« 4.0 Recording
Damage
As a vessel sustains successive hits, that vessel's Ship Log
is used to record damage and its effect. Areas affected include armament,
speed, hull (flooding), fires, damage control and other supporting features
like steering, searchlights and the conning tower. Steps One, Two and Four of
the Damage Phase are used to calculate damage or its after-effects (See
Damage Control for descriptions of Step Three):
Step One - Fire & Flooding: Check for
complications of ongoing fire and heavy flooding. All commanders whose vessels
have active fires and/or heavy or severe flooding must roll once for each fire,
and once for each flooded compartment on the Fire and/or Hvy/Sev FL lines of
the Critical Effects Chart.
Step Two - Hits: Vessels which
correctly guessed the ranges of enemy vessels or positions during the Gunnery
Phase may now roll for hits on the Shell Hits Chart. Any hits which occur as a
result are then applied to the vessels or positions in question. All shell hits
are considered to occur simultaneously. Hits scored by weapons which were then
lost during the Fire & Flooding Step are removed and may not applied to the
target vessels.
During the same step, players also calculate and apply
damage for any torpedoes which struck vessels during the Torpedo Movement Phase
of that turn. Use the Flooding Occurrence and Effects Charts to roll for damage
and effects of each torpedo hit. Torpedo hits are considered to occur
simultaneously with all other torpedo and shell hits for that turn.
Step Four - Sinking & Uneven Flooding: As a vessel suffers
flooding, each of its four main compartments will be marked with the most
severe type of flooding (if any) present in that area. Each level of flooding
carries an inherent point value; light flooding equals one point, moderate
equals two points, heavy equals three points and severe flooding equals four
points.
Uneven Flooding: If opposing vessel compartments
suffer from different flooding levels, the uneven weight distribution of the
water will cause the ship to tilt or list. If the difference is from
side-to-side, the ship will list to port or starboard. It the difference is
between fore and aft sections, the vessel will be "down by the bows" or "down
by the stern." A famous example of the former was the civilian ocean liner
Titanic, which before sinking, was dramatically down by the bows. Players whose
vessels suffer from uneven flooding must consult the Uneven Flooding chart and
apply its effects to the ship in question. Note that a fore/aft disparity is
less likely to result in the loss of a ship.
Sinking: When the
total flooding points present on a vessel reaches five or more, the player must
roll on the Sinking Chart. If the modified die roll matches the corresponding
Sink Roll numbers, the vessel in question has irredeemably begun to sink. At
this point, all weapons cease firing, all damage tracking and control stops,
and the vessel stops moving. The value of one additional die roll equals the
number of turns the vessel will take to sink. Until it sinks, it will remain a
navigational and line-of-sight obstacle as well as a generator of smoke if it
was on fire at the time sinking began.
« 4.1 Damage
Types
Six of the charts on the Battlefleet Combat Sheet contain
abbreviations of damage which may be "inflicted" on participating vessels. Each
of these damage codes triggers a very specific set of events, including fires,
flooding, explosions and damaged or destroyed weapons. The glossary below
offers definitions of all damage codes. Immediately following are guidelines
for recording and positioning the various damage types.
| Damage Code Glossary |
| C |
Conning
tower hit |
Mark the Conning Tower
box on the vessel's ship log with a single damage slash. Until the hit is
"repaired," the vessel may not change its own course and will not respond to
change course orders from divisional or fleet flagships. If the vessel is a
flagship, it may not issue divisional or fleet orders or otherwise execute
command functions, including counter-flood or flood magazine orders. |
| CAP |
Capsize |
Vessel has suffered uneven flooding
which has caused it to flip onto its side and begin sinking. No further
movement, command functions or weapon fire may be conducted by/ from the
vessel. Roll ¼ die to establish how many turns elapse before the vessel
sinks and is removed from the playing area. |
| DC |
Damage
control disabled |
Mark the vessel's
damage control box with a single damage slash. Until repaired, all damage
control attempts for that vessel are reduced to a 12 die roll.
|
| E |
Explosion |
Roll for an explosion on the Critical
Effects Chart, adding to the vessel's ship log any resulting fire and flood
damage and effects which come about as a result of the occurrence. Also, roll
once on the Misc. Damage Chart for side effects. |
| EH |
Electric/Hydraulic Damage |
Roll for
Electric/Hydraulic hits on the Critical Effects Chart, adding to the vessel's
ship log any resulting weapon and damage control effects which occur as a
result. |
| F |
Fire |
One fire is started one board the
vessel. Mark one of the fire boxes in the Damage section of the vessel's ship
log.
During the first step of each Damage Phase, the captains of any
vessels who have active fires on board must roll one die for each fire. A roll
of 10 or 11 will trigger an additional roll on the
Miscellaneous Damage Chart. Immediately apply the effects of any damage
sustained as a result. |
| FL |
Flooding |
Roll once on the
appropriate Flooding Occurrence and Effects sections of the Flooding Chart and
apply the results to the Ship Log.
There are four different
magnitudes of flooding; light, moderate, heavy and severe. These flooding
events can be triggered by shell fire, torpedo hits, and explosions. Affected
compartments are marked only with the worst level of flooding occurring in that
compartment. Vessels always roll on the Flooding Effects section for each and
every flooding hit, even if the hit in question is of a lesser magnitude than
that already affecting the compartment in question.
|
| FU |
Funnel damage |
Cross out one propulsion box as
destroyed. Destroyed propulsion boxes are not repairable. |
| JP |
Rudder
jammed
to port |
Vessel conducts all
further movement as a turn to port (left) using the smallest allowable turning
circle. Repairable on a DC roll of 12. |
| JS |
Rudder jammed
to
starboard |
Vessel conducts all further movement as
a turn to starboard (right) using the smallest allowable turning circle.
Repairable on a DC roll of 12. |
| LTX |
Searchlights destroyed |
Cross out one
searchlight box as destroyed. Destroyed searchlight boxes are not
repairable. |
| |
|
|
| M |
Main position
hit |
Mark one randomly selected main armament
position with a damage slash. Main weapons at that position may not fire again
until the position is repaired on a damage control roll of 12. An "MX" result
causes a main position to be destroyed instead of damaged.
Each main
hit triggers an immediate roll on the Main/TT line of the Critical Effects
Chart. A roll of 12 will trigger an explosion roll on the adjoining line of the
chart. Torpedo tubes which have already fired their torpedoes and main
positions which have flooded magazines are exempt from this critical effect
roll. |
| P |
Propulsion damage |
Mark one previously
undamaged propulsion box with a damage slash. Available speed for the vessel is
reduced to the next highest unmarked box. A "PX" result causes a propulsion box
to be destroyed instead of damaged. |
| S |
Secondary position
hit |
Mark one each secondary class
weapon/position and lower with a damage slash. Weapons at those positions may
not fire again until they are individually repaired on a damage control roll of
11,12. An "SX" result causes the involved positions to be destroyed instead of
damaged. |
| ST |
Steering damaged |
Roll for Steering
damage on the Critical Effects Chart, adding to the vessel's ship log any
resulting steering or turning effects which occur as a result. Once steering
damage has occurred, no further steering damage may be inflicted until the
previous damage is repaired. |
| TT |
Torpedo tube
disabled |
Cross out one torpedo launch position as
destroyed. If the torpedo tube has not yet launched its torpedo, roll once on
the Main/TT line of the Critical Effects Chart for possible damage on the Misc.
Damage Chart. |
| TR |
Turn
radius impaired |
Vessel must use the
next largest available turning circle. A TR hit caused by uneven flooding will
disappear if the vessel is "evened" out via counter-flooding. All other TR hits
are not repairable. If consecutive TR hits require a vessel to use a turning
circle larger than that available, the vessel in question may no longer execute
turns. |
| W |
All weapons |
All main and secondary armaments are
marked with damage slashes. |
| Damage Code Modifiers (Y = Example
Code) |
| YY |
Two
positions hit |
Two identical damage
codes side-by-side requires that two different positions of that feature type
each receive a damage slash. |
| YX |
Position
destroyed |
A letter X after a damage code requires
that the position in question be crossed out with a destroyed mark. |
| all |
Every
position |
The world "all" before
a damage code requires that every presently undamaged position of that type be
marked with a damage slash. |
« 4.2 Damage
Locations
Some types of damage require players to establish where on
the vessel that the damage occurred. Some damage only applies to random
positions or features, whereas other types of damage must be applied in a
specific order. Refer to the Battlefleet
Randomizer to randomly select awkwardly or oddly arranged weapon
positions.
Propulsion - Propulsion boxes are marked-off
progressively, beginning with the highest value and working down to the lowest
value, at which point the vessel may no longer move. Each of the boxes may only
have one damage or destroyed mark on them at any one time. Propulsion hits
which occur beyond the available boxes are recorded in the margin and must be
repaired before repairs to any propulsion boxes may be attempted. Damaged boxes
are always "bumped" down to make room for destroyed boxes.
Example: A
destroyed-box result is inflicted on a cruiser which already has two boxes
destroyed and four damaged (dead in the water). One damage mark would be
recorded in the margin, and the third damaged box would be converted into a
destroyed box. The vessel will now have three destroyed propulsion boxes, three
damaged propulsion boxes, and an additional damage to "propulsion access" which
must be repaired before any repairs of the propulsion boxes proper may be
attempted.
Main - Each main armament hit must be randomly
assigned to a position, which is usually an easy task due to most main guns
being positioned in two turrets. Most players assign a 1 through
6 roll to the forward turret and a 7 through
12 roll to the aft turret. French style battleships with a
lozenge arrangement should use the embattled-side rule and break the location
die roll into thirds instead of halves. All main positions are available for
damage regardless of their current status. Hence, a main position already
destroyed from several hits may be hit yet again, something the attacker will
consider a "wasted" shot. A previously destroyed main position which sustains a
hit will still trigger a critical hit check unless its magazine has been
successfully flooded by the vessel's commander.
Secondary -
Each secondary hit causes the damage or destruction of one position for each
weapon type of secondary class or less. For example, if a vessel has both
secondary and boat gun armaments, one position of each will be lost by an
S result. Lost positions are always taken off of the embattled
side of a vessel first. If no weapons are surviving on the embattled side, then
other previously undamaged weapons on the non-embattled side will be affected.
Weapons in beam patterns 1 or 2 are split into sections (fore, mid, aft) and
must roll for the random location of their damage on the Position Randomizer. Weapons arranged according
to beam pattern 0 represent a homogenous layout and do not need to have their
damage randomized.
Flooding - Flooding due to shell or torpedo
fire will occur randomly on the embattled side of a vessel. For example: Hits
striking the port side of a vessel will be randomly established as being in
either the forward, port amidships, or aft compartment by splitting a 12 sided
die roll into thirds. If hit from ahead, the damage will be randomly
established as being in the forward, port amidships or starboard amidships
compartments. If due to an explosion, the damage will be randomly located in
any one of the four compartments.
« 4.3 Damage
Control
Step three of the Damage Phase is used to repair damage and
otherwise prevent the ocean from fully reclaiming the inside of the vessel.
During this phase, players may attempt to repair damaged areas, flood
magazines, counter-flood to correct listing or extinguish fires. All damage
control actions taken during this step are considered simultaneous, and they do
not need to be executed in any particular order within the step.
All
damage control actions are conducted according to the results of "damage dice,"
up to two of which may be rolled against any one damage event. The number of
damage control dice which a ship may use on any one turn is equal to the number
of propulsion boxes on that vessel which were not permanently destroyed as of
the current turn's command phase. This will give most ships a maximum of six
damage control dice in their normal undamaged state. As propulsion boxes are
destroyed (not damaged), the number of available dice is reduced accordingly.
Repair Actions - Ship-board positions which have been
destroyed are not repairable, and are marked off with a full X instead of a
diagonal slash mark, which indicates repairable damage. In order to attempt the
repair of a damaged area, look up the corresponding roll value for that damage
type as shown on the Damage Control Chart. This represents the value a ship's
commander must roll in order to repair the damaged feature. Each main,
propulsion and steering damage slash requires a die roll of 12 to
"repair," allowing that damage slash to be erased. Secondary damage requires an
11 or 12 to repair. Fires are considered
extinguished on a roll of 11or 12. Players may
attempt to modify a pending sink roll by one die point by rolling a 10,
11or 12. If a position has more than one damage slash,
each slash must be individually repaired, otherwise the position is still
considered damaged and out of commission. Non-command related repair actions
may still be conducted even if a vessel has suffered a Conning Tower hit (See
below).
Command Actions - Command actions are somewhat
different than repair actions in that they depend on an intact chain of
command. Counterflood and Flood magazine orders may only be executed if the
vessel is not suffering the effects of a Conning Tower hit.
Flood Magazine: Destroyed and damaged
main gun positions remain a hazard to their ship because their powder magazines
may still trigger on-board explosions if they suffer penetration hits. To
protect against this danger, any main gun position's magazine may be flooded on
a die roll of 4 through 12. A flooded magazine will
cause its corresponding vessel compartment to gain one level of flooding; none
becomes light, heavy flooding becomes severe, etc. Once its magazine is
flooded, a main position is considered out of commission for the remainder of
the game. If that position is later hit, the vessel commander will not have to
test for an explosion on the Critical Hit Chart.
Counter-flood: A vessel suffering from uneven flooding may
purposefully flood an opposing compartment in order to reduce the vessel's list
and eliminate (or reduce) the uneven flooding's more dangerous effects.
Counter-flooding adds to the overall flooding points present on a vessel, which
will affect that vessel's sink roll. However, counterflooded compartments do
not trigger flooding effect rolls or critical hits (counterflooding is done in
secondary bunker areas, not in critical propulsion or weapon compartments).
A commander wishing to conduct counterflooding must roll a
4 through 12 on a 12 sided die. If successful, any
one compartment on the vessel may then be flooded to whatever degree the
commander wishes. Once counter-flooding is complete, reduce the damage hits to
the appropriate level called for by the Uneven Flooding Chart.
Note
that counter-flooding may also be used to scuttle a vessel by rolling for
"counterflooding" in each of the vessel's four compartments and then assigning
severe flooding to them.
Recover from CT Hit: The one
command action allowed after a conning tower hit is the Recover from CT Hit
roll. The controlling player of a vessel with a CT hit may roll once each turn
in an attempt to reestablish command of a vessel. A die roll of 7
through 12 will reestablish a new vessel commander, and the ship
in question may then operate normally from that point on. Note that because of
the involuntary transfer command rule, nearby vessels may end up
assuming command of a division before a damaged flagship is able to reestablish
bridge control of their own vessel. See Command &
Control. |