|
Miniature Wargaming
101
Introduction - Miniatures - Painting - Mounting
Introduction
 What is miniature wargaming? Miniature wargaming is when you use
scale models or figures of real-life people and equipment to recreate
battles from some period in history, or even the future. This is done
with the aid of rules which are used to reproduce the actual conditions
of movement, combat and morale. Miniature wargaming rules range from simple
to complex, depending on the goal of the rule designers. Complex rules may
move at a slower pace and require more work, but the way combat plays out
will more closely match the results of real life combat. Simple rules can move
faster and require less work, but they will be less focused on
historical details for the various game steps or final results. These later
rule types emphasize fast and interesting game play. This is well known as the
"Speed versus Accuracy" issue, which most designers resolve by creating a
modestly accurate system that can be learned by most people. A solution used at
WTJ (and elsewhere) is to speed up game play by abstracting mid-turn combat elements, while
working to give final results are still accurate. This hybrid approach has proven
very popular. What is miniature wargaming? Miniature wargaming is when you use
scale models or figures of real-life people and equipment to recreate
battles from some period in history, or even the future. This is done
with the aid of rules which are used to reproduce the actual conditions
of movement, combat and morale. Miniature wargaming rules range from simple
to complex, depending on the goal of the rule designers. Complex rules may
move at a slower pace and require more work, but the way combat plays out
will more closely match the results of real life combat. Simple rules can move
faster and require less work, but they will be less focused on
historical details for the various game steps or final results. These later
rule types emphasize fast and interesting game play. This is well known as the
"Speed versus Accuracy" issue, which most designers resolve by creating a
modestly accurate system that can be learned by most people. A solution used at
WTJ (and elsewhere) is to speed up game play by abstracting mid-turn combat elements, while
working to give final results are still accurate. This hybrid approach has proven
very popular.
Because there is no international standard for rating the
complexity of miniature wargaming rules, it is up to individual players to
decide for themselves which rules are too simple or complex for them. Rules
are widely available online, some of which cost money and
some of which are free. Most of the better known rule systems are pretty widely discussed in online forums, those are typically the best places to start for getting opinions.
So the two most important items for gaming are
rules and figures. The rest of this section will address the issue of figures
and how to prepare them for use. The actual process of painting figures and
playing wargames is fairly simple, but where to begin can be a difficult
decision. The best way to begin is to choose a period or story type which you
find interesting. Your best incentive for historical gaming will be the reading
of eyewitness accounts and narratives for the era of combat being simulated, so if you
are already interested in the subject, it helps a lot. For science-fiction or
fantasy, then the books or computer games themselves will usually be your best
sources.
Another valuable thing to remember is that your interest in
gaming or in a particular genre of gaming will vary over time. If you seem to
lose interest in a particular period, don't worry about all those miniatures
you bought. Humans thrive on variety, so you will probably develop interests in
various genres of gaming, and will bounce around from one to the
other, alternately putting away and pulling out batches of miniatures to fill
your most recent interest. You would be surprised at how many people I know who
sold their stuff only to get back into it again a couple of years later. Rotating interests is a normal thing, or as William Cowper said, "variety is the spice of life."
Once you decide
on a genre that interests you, contact local players or gaming groups which put
on games for that period (if you have not gamed before). Try to play with more
than one group so that you have variety in the games played. Beware of isolated
groups made up of people who argue too much, or groups who have individuals
that are allowed to capitalize on everybody else's time (an issue common to
all hobbies). Wargaming involves an investment of your time, and you
should invest that time wisely with people or groups who are easy going and
interesting. Most players and gaming groups are great, and they will usually
have established miniatures and rules for game play, which will give a good
clue as to which figures you want to buy and paint. This leads us to the
subject of the miniatures themselves.
Miniatures
Most gaming
miniatures fall into a few categories based on two basic factors: materials and
scale. The question of materials is simple, since most gaming miniatures are
made of metal or plastic (including 3D printing polymers). Metal miniatures are heavier, durable and offer a good base for painting. Plastic miniatures are easier to mass-produce and may have more variety (depending on the maker) for their price. In the case of 3D printed models, they may often provide miniatures for model types that otherwise could not be made available through traditional manufacturing methods.
The question of scale is
more complex and requires some explanation. Most gaming scales are expressed
using one of two standard methods: fractional and metric. Each standard of
scale has it's own normal area of usage which we will outline below:
Fractional: Most lines of miniatures
designed on a fractional scale standard will be centered on man-made devices,
such as tanks, ships, planes, trains, etc. The fractional scale system works
just like it sounds. The scale refers to the difference in size between the
model and the real thing. So a 1/2400 scale battleship model will be 1/2400th
the size of the real life ship. This means that the 863 foot long battleship
Yamato would be about 4.3 inches long in 1/2400 scale (863 ÷ 2400 = .36
feet). Some of the more common fractional scales and their common applications
are:
| Scale |
Land |
Aviation |
Naval |
| 1/72 |
x |
x |
- |
| 1/76 |
x |
- |
- |
| 1/32 |
x |
- |
- |
| 1/287 |
x |
x |
- |
| 1/300 |
x |
x |
- |
| 1/600 |
- |
- |
x |
| 1/700 |
- |
x |
x |
| 1/1000 |
- |
- |
x |
| 1/1200 |
- |
x |
x |
| 1/1250 |
- |
x |
x |
| 1/1500 |
- |
- |
x |
| 1/1800 |
- |
- |
x |
| 1/2400 |
- |
- |
x |
| 1/3000 |
- |
- |
x |
| 1/6000 |
- |
- |
x |
The most common fractional "mechanical" land war scales in
use today are 1/72th (which corresponds to the metric 20mm scale) and the 1/287
and 1/300 "micro-armor" scales (which correspond to the 6mm metric scale). The
most common air war scales are 1/72 for WWI combat, and 1/300 scale for other
periods. The most common naval gaming scale is 1/2400, with some other scales such as 1/1800 and 1/6000
offering a close second as popular scales for predreadnought combat and
later.
Metric: Most metric gaming scales emphasize
recreating the human form, hence the wide use of the metric scale models for
use for land based combat. In this system, the scale refers to the height of a
single human. So a 20mm scale model series will be based on the calculation of
a scale human figure being roughly twenty millimeters tall. However, different
model designers use different measurement standards to design their figures.
Human figures are always created mounted to a small base, and some designers
include those bases in the overall height. Others do not. The result is some
variation in size, even among theoretically identical scales. For example, the
very common 15mm figure range features some manufacturers who offer figures
whose scale "humans" are only 13½mm tall, whereas some other makers of
15mm figures offer miniatures whose scale humans are more like 16mm tall. The
variation when placing two such differently designed figures side-by-side can be noticeable. The chart below offers a
rough outline of the most common metric scales and a few related periods of
land warfare. Included with some scale entries are fractional scale equivalents.
| Scale |
Ancient &
Medieval
(before the year 1453) |
Pre-modern
(1454 -1865) |
Modern
(1866 and later) |
| 6mm (1/285 & 1/300) |
x |
x |
x |
| 10mm (1/160) |
x |
x |
- |
| 12mm |
- |
- |
x |
| 15mm (1/100) |
x |
x |
x |
| 18mm (1/87) |
x |
x |
|
| 20mm (1/72) |
- |
x |
x |
| 25mm |
x |
x |
x |
| 28mm |
x |
x |
- |
| 30mm |
- |
x |
- |
As can be seen, some of the more common scales used
are 6mm, 15mm and 25mm. But there are other scales now widely offered that have helped to broaden the selection of miniatures for various periods. For example, 20mm has fallen away in popularity for Napoleonics, but that scale remains very strong for gaming World War 2 (along with 15mm). Besides 6mm and 15mm, another Napoleonic scale widely available is the extremely high quality line of 18mm figures by AB miniatures, whose life-like appearance places them near the top of any consideration for that era. The Napoleonic figures shown at the top of this article are AB 18mm Austrians. The 10mm and 12mm scales are more recent (comparatively speaking) and have increased in popularity due to their combination of economy, gaming space
and detail. We use a lot of 12mm World War 2 armor for development of WTJ's 1943 gaming rules, it is a great scale for armor-heavy WW2 gaming that still includes a lot of infantry.
Painting
Painting figures
can be divided into four steps: deburring, temporary mounting (holding),
priming and painting. We will cover each step separately, discussing supplies
and equipment, basic steps and recommended techniques. We cannot recommend how
many figures you should attempt to paint all at once, since figures vary in
size and type (infantry, naval, aircraft, etc.). But most people paint anywhere
from 10 to 30 infantry figures at a time, depending on the sizes of units being
used in the rules they play. Painting one figure at a time is not advised,
since your brushes are probably not cheap, and the repeated cleanings which
come as a result of such small groups will shorten the life of your precious
commodities!
- Deburring - When you first buy your figures,
they will often have bits of metal left on them from the molding process. These
will have to be removed before you prime the figures. Metal figures may also have mold release on them, which is bad for paint adhesion. Wash metal miniatures in liquid detergent and dry thoroughly before priming.
- Equipment: X-acto knives (large and small), nail
clippers and sandpaper.
- How to: Use the shearing strength of the nail
clippers to remove the largest chunks and easy to access pieces. Then use the
X-acto knife to clean up the detailed areas, and for infantry bases, to slice
the bottom of the base smooth. Sandpaper also works well for quickly flattening the bottom of a metal infantry base. In the case of metal tank models which need to
be assembled, forming the tread segments or at least examining them for
consistent form is advised. Make sure to use a small X-acto knife to clean up
the basic outline of infantry figures, in case there is flashing along the
parting lines (where the mold halves met).
- Temporary Mounting - Instead of trying to hold
onto each miniature separately as you try to paint it, it is common to
temporarily mount miniatures on small disposable chits, sometimes even the
cardboard chits out of board games. My preferred method is to use the extra
wide wooden popsicle sticks sold at most craft supply stores. Instead of gluing
the miniatures in place, I use clear adhesive glue-dots which are also sold in
most craft supply shops. 15mm human figures can readily be lined up three or
four per stick for easy holding and access. Also, the wooden sticks double as
good paint palettes.
- Priming - If you paint figures without primering
them, it will usually cause a number of different problems. The colors of the
paint will not be as vivid, and the paint itself will come off easily unless
sealed. Some very finely detailed models can be painted without primering by
using two thin coats of paint, followed by careful sealing. For most infantry
and land war figures, primering is advised since they will be handled a lot. In
the case of plastic figures, primering is more important to give the figure
some extra resistance against flexing (which causes paint to chip off). Make
sure to wash plastic figures in a strong solution of detergent before
attempting to prime and paint them.
- Equipment: For most all figure types, Citadel Corax spray primer is
highly recommended. Always
test prime a single figure and check the results.
- How to: Priming figures is fairly simple. Find a
large, flat piece of material such as cardboard or an aluminum pizza pan, line
of your figures up on it, and take it outside (Remember to paint outside, or in
a well ventilated area, no huffing on the job!). Shake the primer can very,
very thoroughly before you spray. Also allow each side of the figure to dry
before flipping it over to spray the other side. Priming your figures in warm
weather, or under warm conditions, is best. If the weather is really bad, then
buying a bottle of brush-on primer and painting it on may be the best
solution.
 Painting - The two most important
items you will need for painting will be paint and brushes. You should try to
buy the best possible paints and brushes because the results of your labor will
be better rewarded. Cheap brushes do not coat evenly, they shed their bristles
onto your work and their tips quickly curl over into imprecise hooks. They also
do not last very long, and you end up having to spend more money anyway. Cheap
paint has less pigment and leaves things looking uneven and washed out. Painting - The two most important
items you will need for painting will be paint and brushes. You should try to
buy the best possible paints and brushes because the results of your labor will
be better rewarded. Cheap brushes do not coat evenly, they shed their bristles
onto your work and their tips quickly curl over into imprecise hooks. They also
do not last very long, and you end up having to spend more money anyway. Cheap
paint has less pigment and leaves things looking uneven and washed out.
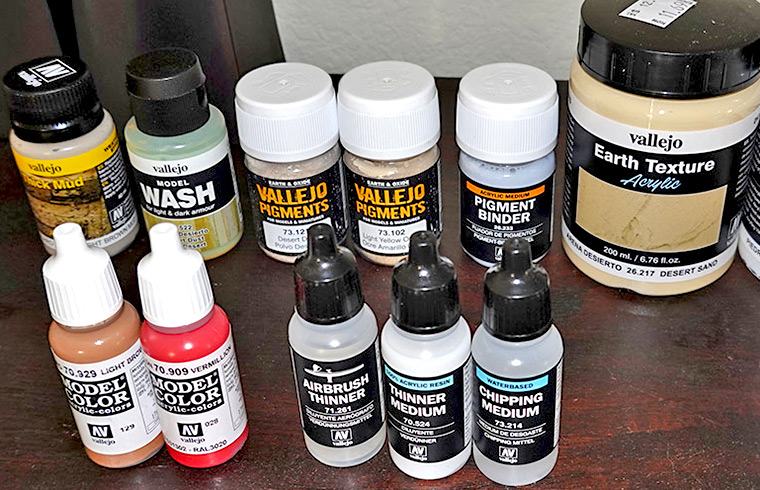
- Equipment - Paint: There are two types of paint;
water-based acrylic, and oil-based enamel. Water based paints are by far the easiest to
work with, because you can clean up the brushes using water. Water clean-up
also extends the lives of those expensive little brushes. Some of the best
known paint manufacturers for miniatures are Citadel and Vallejo Model Colors, both of which have helped to push painting technology forward with a wide variety of both paints, and other washes, contrasts and highlight media that give realistic results. Make sure to seal your completed work with a good clear
seal coating. The best to use is Krylon UV-Resistant Clear Matte Acrylic Coating. Final note: Shake and manually stir your paint, thoroughly. Buy a Robart paint shaker, they are worth their weight in gold.
Equipment - Brushes: Many people use a combination of "throw
away" synthetic brushes for unimportant work, and good quality kolinsky brushes
for high value precision paint work. Of the later, the best brushes you can buy
are the Da Vinci Maestro series of Winter Kolinsky brushes. They are
outstanding quality and have long bristles that extend deep into the ferrule,
which prevents the brushes from pulling out during cleaning and also makes for
a longer lasting brush. If the Da Vinci are too expensive, there are several
lines of sable and taklon brushes made by Loew Cornell which also work well,
and they are much more widely sold at major craft supply stores than Da Vinci.
Buy at least five or six different sizes of brushes, from tiny to medium-large,
and keep a small cup of water and paper towels and toilet paper nearby for
cleaning them. Never let the paint dry on your brushes, as that will quickly
ruin them. Mainstream acrylic paint can start to polymerize (harden) at the base of the brush even while you are painting. It is best to repeatedly dip-rinse the brush while you work, to keep the paint from hardening the base of the bristles any more than necessary.
How to #1: The first painting example is of a French
infantryman for the Napoleonic Wars. A World War Two figure will use much the
same technique, except that the variety of colors used will be different. Begin
by painting the one or two most dominant colors present on the model, in this
case the white pants and lapel and the dark blue tunic. Once these basic colors
are painted, you should next paint the areas which are recessed, and therefore
most likely to be painted over. So for an infantry figure, you might want to
paint in this order: pants/tunic, face, boots, backpacks/bags, headgear,
straps, hands, buttons, etc. After you paint your figures, coat them with a
light coat of Krylon UV-Resistant Clear Coat, remembering to shake well before
using. This takes away the glossy effect of some paints (who ever saw a glossy
paratrooper?) as well as protecting your paint job against heavy handling. Some painters do coat their figures with gloss sealer because they enjoy the
shiny depth that the gloss coat lends to the appearance of the finished
figures. This does indeed
accentuate the vividness of paint schemes, especially those for periods already
known for brightly colors uniforms like the Napoleonic, Seven Years War and
others.
How to #2: For ship models (both
historical and sci-fi) you should start by painting the basic hull color. Some
ships, such as those from the turn of the century, have elaborate painting
schemes which require careful painting, or at least attention to what colors
the various section of the ship were painted. Painting the deck and other hull
details almost last usually works well. For this, use a flat brush, with
strokes going outward, from inner edge to outer edge. Trying to paint the deck
along the edge (down the length) of the ship usually results in an uneven
border. As before, coat finished vessels with a coat of Figure Flat sealer.
Mounting
Once your figures
are painted, or mostly painted, you will often need to mount them on bases. For
infantry figures this is a fairly easy process. The set of rules you use will
give the dimensions for the bases, and all you need to do is either cut bases
out of thin sheets of balsa wood, or buy pre-cut metal bases. Some gaming rules
use individual figures for combat, and so the number of figures attached to
each base may be important. Other gaming rules use bases for calculating combat
results, and in those cases, the number of figures attached to each base
doesn't usually matter. For naval models, painting the base dark blue with
white dappling patterns for the wake adds a realistic effect. Below are shown
an assortment of miniatures of various scales and periods. This gives some idea
as to appearance and final mounting technique, which can vary
greatly
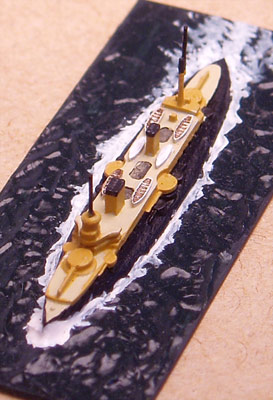 |
| Above is a closeup photo of the 1/3000
scale French battleship Carnot, painted in her late Victorian era black and
ochre livery. The model has been mounted on a thin styrene plastic base, with
water texture added using Vallejo Plastic Putty. The plastic putty surface
(which is fast drying) was then painted dark sea blue with some various white
highlights, and then generously finished with a gloss sealer. As with most
gaming miniatures, this model was received as a raw, unpainted pewter casting.
For those not fond of the idea of actually painting, there are countless
painting services available worldwide. |
| |
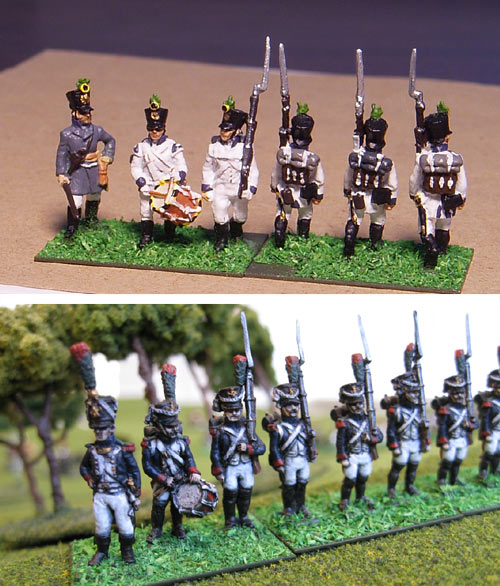 |
| Above are shown two "levels" of paint
jobs for 15mm Napoleonic infantry. The top level would be considered an
average "wargame grade" paint job for these Austrian line infantry. The bottom
photo shows how a good professional painter would paint some French guard
infantry. Note the detailed shading and facial highlights. |
| |
| |
| |
| |
|
